> This is part 1 of 2 of the full documentation (pages 1–100 of 154).
> The content is paginated: fetch every part to see all of it.
> Next part: https://docs.mechcloud.io/llms-full.txt/1
> Page index: https://docs.mechcloud.io/llms.txt
# What is MechCloud?
[MechCloud](https://mechcloud.io/)® is a **Stateless Infrastructure as Code (IaC) and DevOps platform** for designing, provisioning and operating cloud infrastructure across multiple providers. **It is the only DevOps platform which supports Stateless IaC.**
Unlike traditional IaC tools that depend on persistent state files (for example, Terraform state stored locally or in a remote backend), MechCloud operates in a **stateless mode**, where the live cloud and system APIs are treated as the source of truth. Infrastructure changes are derived by comparing the declared desired configuration with the actual state observed at runtime, eliminating state drift, locking issues, and state management overhead.
### MechCloud Advantage over traditional IaC tools
* **No state files and so no object storage or encryption required**
* Real-time pricing integrated directly into the plan
* Cost explorer to track the cost at resource and resource dimensions (storage, throughput, iops etc) level.
* Real-time visualization of the cloud resources
* No storage of any short or long lived credentials (api keys, service account tokens etc) **and so no need to pay for expensive credentials vaults.**
* Can control any REST API running anywhere (public network, private network, local machine) without requiring any site to site vpn setup
* Eliminates the need of installing and upgrading any CLI (e.g. aws, azure, terraform, kubectl etc) which connects to the REST API of the target platform
* Fully browser based and so DevOps engineers can manage infrastructure from any machine without installing any additional tool (e.g. CLI) on such machines.
### Supported public cloud providers
| Feature | AWS | Azure | GCP |
| ----------------------- | --- | ----- | --- |
| Stateless IaC | ✓ | ✓ | ✓ |
| Real-time Pricing | ✓ | ✓ | ✓ |
| Cost Explorer (Gantt) | ✓ | ✓ | ✓ |
| Discover Assets | ✓ | ✓ | ✓ |
| Real-time Visualization | | | |
### AI Agents
#### AWS Agent
The AWS Agent enables querying and managing resources across one or more AWS accounts using natural language instructions. It operates directly against live AWS infrastructure and **does not require storing AWS API keys in MechCloud**.
All interactions are performed using delegated, short-lived access mechanisms, ensuring that no long-lived credentials are persisted.
#### REST Agent
The **REST Agent** is a generic control-plane agent that can be used to control **any platform that exposes its control plane over a REST API**.
This includes, but is not limited to:
* Cloud platforms and services (e.g. Cloudflare)
* Kubernetes and container platforms
* Docker
* Internal infrastructure systems
* Custom or third-party platforms
* Internal REST APIs
The REST Agent can interact with REST APIs **running anywhere**, including:
* Public networks
* Private networks
* Local machines
It does **not require any VPN connection** between MechCloud and the target system.
Like all MechCloud agents, the REST Agent **does not store API keys or any other long-lived credentials**.
This allows MechCloud to act as a unified DevOps control plane across heterogeneous systems without introducing network complexity or credential management overhead.
### Dashboard Builder
One can create custom dashboards and keep related dashboards under a site. Custom components, which can be loaded from local machine too for testing purpose, allows you to build rich and interactive dashboards having data from any infrastructure platform you can imagine.
# Release changelog
# Changelog # 4 (2024.02.08\_01)
### AWS
* Support for real-time visualization of Vpc, Subnet and Virtual server resource types **using tags based approach**.
* Support for real-time visualization of virtual server states (e.g. running, stopped etc).
### GCP
* Support for real-time visualization of Vpc, Subnet and Virtual server resource types including state changes for virtual servers.
# Changelog # 5 (2024.02.10\_01)
### Real-time visualization
* Fixed issue of an SSE connection getting disconnected after 100 seconds if there are no real-time updates in this duration.
* SSE connection will now remain opened for 25 mins without any disconnection and will be closed after that automatically.
# Changelog # 6 (2024.02.15\_01)
### AWS
* Support for real-time visualization of Vpc, Subnet and Virtual server resource types **using cloudtrail based approach**.
### Cloud Accounts
* Support for setting sync mechanism (tags or cloudtrail) for AWS accounts.
### Discover Assets
* Support for showing only active accounts in **Select cloud accounts** dropdown.
# Multitenancy
MechCloud supports two levels multitenancy with following concepts -
* [Tenant](/administration/multitenancy/tenant)
* [Team](/administration/multitenancy/team)
# Tenant
MechCloud supports two types of tenants at this moment -
* Simple
* Partner
Major difference between a Simple and Partner tenants is that a Partner tenant can create its own tenants **which can be Simple tenants only**.
### 1. Partner tenant
#### 1.1 Infrastructure Management
* A partner tenant can restrict cloud provider regions for its child tenants to make sure that the tenants managed by it can create or discover resources in these regions only.
* E.g. if you are a partner from India, who is catering to customers from India only, then you can select India regions across three hyperscalers to make sure that your customers from India are restricted to India regions only.
* If you are catering to customers from multiple countries then you can select hyperscaler regions (e.g. US and India) for all such countries at the partner tenant level. Tenant admin of your child tenant will then be able to restrict its tenant to some or all the regions configured at the parent tenant level.
# Team
### Default Team
By default MechCloud defines only one team - **Default (Managed)**. This is an unshared but managed team.
* All **authenticated** users are by default members of this team but have only **contributor** and **cloudadmin** roles on this team.
* As **authenticated** users are not assigned **creator** role on this team, **an authenticated user can't register custom components (Frame, Layout, External Page, Component) on this team**.
### Parameters
| Parameter | Description | Editable for an existing team | Tutorials / Demos / Sample Code |
| ------------------------------------------ | ----------------------------------------------------------------------------------------------------------------------------------------------------------------------------------------------------------------------------------------------------------------------------------------------------------------------------------------------------------------------------------------------------------------------------------------------------------------- | ----------------------------- | ----------------------------------------------------------------------------- |
| **Single Person** |
Enable this to create a shared and unmanaged team without configuring advanced team parameters. Useful for solopreneurs or anyone who starts with one person team but may grow to 2-3 members in the future. This is to keep MechCloud UIs simple by default for small teams.
Disable this to see advanced team parameters.
| No | |
| **Shared** |
In a shared team, a team member can see and access the assets created by other team members which is not possible in case of an unshared team.
In a shared team, two members can't register or create two or more resources of same type (e.g. Frame).
| No | |
| **Managed** |
A managed team inherits custom components (e.g. frames, layouts) registered under its parent team.
It is not allowed to register or override custom components under a managed team.
| No | |
| **Owner Team** |
This parameter will be visible for managed teams only.
An owner team is the one which this team will inherit custom components from.
Only a shared team can be an owner team. However, this shared team must be created by the same user who is creating a new team.
| No | |
| **Custom Components Host** |
This parameter will be editable for unmanaged teams only while creating a new team.
This parameter is read only for a managed team and inherited from its parent team.
This is used to specify the url of a micro app which will be used to load custom components created by third parties.
This parameter can be overridden at the site level for unmanaged teams only.
| | Reference micro app - |
| **OIDC Proxy** |
This parameter will be editable for unmanaged teams only while creating a new team.
This parameter is read only for a managed team and inherited from its parent team.
This is used to specify the url of an OIDC (OpenId Connect) proxy which allows MechCloud to communicate with any third party REAST API (e.g. Cloudflare, MongoDB Atlas etc) without storing api key for any such APIs.
| | Reference - |
| **Members** |
Specify email ids of all the users who should be member of this team. Add 'authenticated' group as member if you want all authenticated users to be the members of this team.
A user/group must be added to the members before it can be assigned any role on the team.
| | |
| **Creators / Contributors / Cloud Admins** | See [#roles](#roles "mention") section. | | |
There are two important aspects of a team which can be configured while creating a team -
### Shared vs Unshared
* A shared team is the one where any asset (e.g. Site, Frame, Layout etc) created by any team member is visible to all the other members of the team. In a shared team, one can't create two resources of same type (e.g. Frame) using same metadata (name, title, code etc). This restriction is not there for an unshared team but a member of an unshared team can't see custom components registered by other team members.
**Examples**
* As a small startup, you can create two teams - **Employees** and **B2CCustomers**. Here you may choose **Shared** for **Employees** team while unshared must be chosen for the **B2CCustomers** team. **Employees** team will have developers and testers where testers need to see the Frames, Layouts etc registered by developers so that testers can use these to create test websites and validate these components before these components can be made available to the B2C or B2B customers. **B2CCustomers** team should be unshared as you don't want one user to see the data of another user when the members of this team are not related to each other in any way.
### Managed vs Unmanaged
* A team can either be managed or unmanaged. A managed team has some restrictions (e.g. can't register its own frames/layouts/external pages/components) imposed on it and inherits certain things (frames/layouts/external pages/components) from its parent (unmanaged) team.
* If you configure a team as managed then you will need to select an unmanaged team as a parent for this team. It means you must have at least one unmanaged team created before you can create one or more managed teams.
**Examples**
* You can create two teams - **Employees** and **Customers** where **Developers** team is configured as unmanaged while **Customers** team is configured as managed (by **Developers** Team). Now whatever assets (e.g. Frames, Components, External Pages etc) will be registered in the **Developers** team will be visible in the **Customers** team but members of the **Customer** team will not be able to register their own custom components (frame, layout etc) or edit the details of custom components inherited from the parent team.
### Single Person Team
A single person team is a shortcut to create a shared but unmanaged team. This is suitable for startups / agencies which starts with and remains one man show for a short/long time but may grow to 2 or 3 persons in future. This is something which will be very common in an AI powered era.
### Roles
MechCloud defines some roles which are specific to the Team resources. Each role is associated with a certain module (Site builder, Infrastructure management). These roles are as follows -
| Module | Role | Comment |
| -------------- | ----------- | ------------------------------------------------------------------------------------------------------------------------------------------------------------------------------------------------------------------------------------------------------------------------------------------------------------------------------------------------------------------------------------------------------------------------------------------------- |
| Site Builder | | |
| | Creator |
This role allows a user to register frames, layouts, external pages and components under a team.
Note - This role must be explicitly assigned to the user who has created a team and so have admin role by default.Single person teams are an exception of this rule where team admin is automatically added to all the roles associated with the Team resource type.
|
| | Contributor |
This role allows a user to create sites and site nodes under such sites in a team.
Note - This role must be explicitly assigned to the user who has created a team and so have admin role by default.Single person teams are an exception of this rule where team admin is automatically added to all the roles associated with the Team resource type.
|
| Infrastructure | | |
| | Cloud Admin |
This role allows a user full access to Infrastructure module where a user with this role can add cloud / REST accounts etc.
Note - This role must be explicitly assigned to the user who has created a team and so have admin role by default.Single person teams are an exception of this rule where team admin is automatically added to all the roles associated with the Team resource type.
|
# Subscriptions
MechCloud has support for the following subscriptions at this moment -
* [Basic](/administration/subscriptions/basic)
* [Pro](/administration/subscriptions/pro)
* Team (Coming soon)
* Startup (Coming soon)
* Enterprise (Coming soon)
* Partner (Coming soon)
# Basic
### **1. Pricing**
**Price** - $0
### 2. Features
#### 2.1 Multitenancy
* **Tenant** - No support
* **Team** - Two teams in the default tenant
#### 2.2 Site Builder
* **External pages** - 5
* **Frames** - 1
* **Components** - 5
* **Number of sites** - 1
* **Pages per site** - 5 (Design as well as External)
#### 2.3 Infrastructure
* **Cloud Accounts** - Two accounts per cloud provider (AWS, GCP and Azure)
* **Vpc**
* GCP - Two VPCs per project
* AWS / Azure - Two VPCs per region
* **Subnet** - Two subnets per vpc
* **Virtual Server** - Two virtual servers per subnet
# Pro
### **1. Pricing**
**Price** - $10 / month
### 2. Features
#### 2.1 Multitenancy
* **Tenant** - 5 children tenants
* **Team** - 10 teams per child tenant
# Add An Account
# AWS
You will need to configure MechCloud IdP as an identity provider in AWS in order to make this integration work without AWS API credentials.
### Configure MechCloud IdP into AWS Account
#### Add an identity provider
* Log on to [AWS console](https://aws.amazon.com/console).
* Navigate to **IAM -> Identity providers** and click on **Add provider** button to add an OIDC identity provider with following details -
| Field | Value |
| ---------------- | -------------------------------------------------------------------------- |
| **Provider URL** | [https://id.mechcloud.io/](https://mechcloud-piston-preview.eu.auth0.com/) |
| **Audience** | n6dMQlo8ZCE5QxLY4o2KjeBaSn8eefTX |
#### Create an IAM role
Now assign an IAM role to the newly added **OIDC** provider by following below instructions -
* Go to **IAM -> Identity providers** and click on the provider created in the previous section.
* Click on A**ssign role** button.
* Select **Create a new role** radio button.
* Select following details on the next page and click on **Next** button -
* Select permissions policies (e.g. [AmazonEC2ReadOnlyAccess](https://us-east-1.console.aws.amazon.com/iam/home?region=ap-south-1#/policies/details/arn%3Aaws%3Aiam%3A%3Aaws%3Apolicy%2FAmazonEC2ReadOnlyAccess)) on the next page which you want to assign to this role and click on the **Next** button.
* Specify **MechCloudWebIdentityRole** (or any other name) under Role name on the next page and click on **Create role** button to create the role. Make sure you replace **MechCloudWebIdentityRole** in following steps if you decide to use a different name for this role.
* **(IMPORTANT)** Make sure that you specify a condition under the **Trust relationships** tab of **MechCloudWebIdentityRole** role as shown in the below image so that only users with specific email ids can assume this role. **In the absence of this condition, any user who is logged into MechCloud and knows your AWS account number and the role name will be able to assume this role on your AWS account which can result in unexpected charges if you have assigned permissions to provision AWS resources to this role.**
* **(IMPORTANT) Also, make sure to revoke existing sessions whenever you remove a user from the condition highlighted above. This will block the access for those users who were removed from the above condition but still have a valid session token.**
### Add an AWS Account with newly created IAM Role
* Log on to [MechCloud](https://portal-preview.mechcloud.io) and navigate to **Infrastructure** -> **Cloud Accounts**.
* Select a team.
* Select AWS under **Select a cloud provider** dropdown. This will display all the cloud accounts added for the AWS cloud provider.
* Click on **New Cloud Account** button.
* Enter a name for your account.
* Enter AWS account number and IAM role details as shown below -
* Click on **Save** button to add the cloud account.
# GCP
MechCloud uses Workload Identity Federation (WIF) to authenticate with GCP, eliminating the need for service account keys. This is more secure as there are no long-lived credentials to manage or rotate.
### Step 1: Create a GCP Project (if needed)
1. Log on to [GCP Console](https://console.cloud.google.com).
2. If you don't already have a project, create one from the project selector at the top of the page.
3. Note down the **Project ID** (not the project name) — you'll need it later.
### Step 2: Enable Required APIs
Enable the following APIs in your GCP project. Navigate to **APIs & Services** -> **Library** and enable each one:
| API | Purpose |
| --------------------------------------- | --------------------------------------------- |
| **IAM Service Account Credentials API** | Required for Workload Identity Federation |
| **Security Token Service API** | Required for token exchange in WIF |
| **Compute Engine API** | For VM, disk, and network resource management |
| **Cloud Resource Manager API** | For project-level operations |
| **Kubernetes Engine API** | For GKE cluster management (if using GKE) |
| **Cloud Logging API** | For Cost Explorer audit log queries |
| **Cloud Billing API** | For pricing information (Cost Explorer) |
### Step 3: Create a Service Account
1. In the GCP Console, navigate to **IAM & Admin** -> **Service Accounts**.
2. Click **Create Service Account**.
3. Enter a name (e.g., `mechcloud-wif`) and description.
4. Click **Create and Continue**.
5. Assign the following roles based on your needs:
| Role | Purpose |
| ------------------------------------------------------- | ------------------------------------------------------- |
| **Compute Viewer** (`roles/compute.viewer`) | Read-only access to Compute Engine resources |
| **Kubernetes Engine Viewer** (`roles/container.viewer`) | Read-only access to GKE clusters (if using GKE) |
| **Logs Viewer** (`roles/logging.viewer`) | Read audit logs for Cost Explorer |
| **Compute Admin** (`roles/compute.admin`) | For Stateless IaC to create/update/delete resources |
| **Kubernetes Engine Admin** (`roles/container.admin`) | For Stateless IaC to manage GKE clusters (if using GKE) |
Choose read-only roles if you only need asset discovery and Cost Explorer. Add admin roles if you plan to use Stateless IaC.
6. Click **Continue** and then **Done**.
7. Note down the **Service Account Email** (e.g., `mechcloud-wif@your-project.iam.gserviceaccount.com`).
### Step 4: Create a Workload Identity Pool
1. Navigate to **IAM & Admin** -> **Workload Identity Federation**.
2. Click **Create Pool**.
3. Enter the following details:
| Field | Value |
| --------------- | ------------------------------------------- |
| **Name** | `mechcloud-pool` (or any descriptive name) |
| **Pool ID** | `mechcloud-pool` (auto-generated from name) |
| **Description** | MechCloud OIDC federation pool |
4. Click **Continue**.
### Step 5: Add an OIDC Provider to the Pool
1. On the **Add a provider to pool** page, select **OpenID Connect (OIDC)**.
2. Fill in the following details:
| Field | Value |
| ----------------- | -------------------------------------------------------------------------------- |
| **Provider name** | `mechcloud-idp` (or any descriptive name) |
| **Provider ID** | `mechcloud-idp` (auto-generated from name) |
| **Issuer (URL)** | `https://id.mechcloud.io/` |
| **Audiences** | Select **Allowed audiences** and enter your MechCloud audience value (see below) |
#### Finding Your Audience Value
1. Log in to [MechCloud Portal](https://portal.mechcloud.io).
2. Open a new browser tab and navigate to: `https://portal.mechcloud.io/oauth2/auth1`
3. This displays your JWT token. Decode it using [jwt.io](https://jwt.io) or similar tool.
4. Find the **aud** (Audience) claim — use this value for the **Allowed audiences** field (e.g., `n6dMQIo8ZCE5QxLY4o2KjeBaSn8eefTX`).
5. Click **Continue**.
### Step 6: Configure Provider Attributes
On the **Configure provider attributes** page, map the following attributes:
| Google Attribute | OIDC Attribute |
| ---------------- | --------------- |
| `google.subject` | `assertion.sub` |
This maps the MechCloud user's subject claim to the Google identity.
Click **Save** to create the pool and provider.
### Step 7: Grant Service Account Access to the Pool
1. Navigate to **IAM & Admin** -> **Workload Identity Federation**.
2. Click on the pool you created (`mechcloud-pool`).
3. Click **Grant Access** at the top.
4. Select the service account you created in Step 3 (e.g., `mechcloud-wif@your-project.iam.gserviceaccount.com`).
5. Under **Select principals**, choose **Only identities matching the filter**.
6. Set the attribute condition to restrict access to your specific MechCloud user:
| Field | Value |
| ------------------- | -------------------------------------------------------------------- |
| **Attribute name** | `google.subject` |
| **Attribute value** | Your MechCloud `sub` claim (e.g., `auth0\|690895c8b0ac201506c31175`) |
#### Finding Your Subject Claim
Use the same JWT token from Step 5. Find the **sub** (Subject) claim — this is your unique MechCloud user identifier.
**(IMPORTANT)** This condition ensures that only your specific MechCloud user can impersonate the service account. Without this condition, any authenticated MechCloud user who knows your project details could access your GCP resources.
7. Click **Save**.
8. A panel will appear showing the **Workload Identity Pool Provider** resource name. It will look like:
```
projects/PROJECT_NUMBER/locations/global/workloadIdentityPools/mechcloud-pool/providers/mechcloud-idp
```
Note down this full provider resource name — you'll need it when adding the account in MechCloud.
**Tip**: You can also find this value later by navigating to **IAM & Admin** -> **Workload Identity Federation** -> click on your pool -> click on your provider -> copy the **Default audience** or **Resource name** value.
### Step 8: Register Your GCP Account in MechCloud
1. Log on to [MechCloud](https://portal.mechcloud.io) and navigate to **Infrastructure** -> **Cloud Accounts**.
2. Select a team.
3. Select **GCP** under **Select a cloud provider** dropdown.
4. Click on **New Cloud Account** button.
5. Enter a name for your account.
6. Fill in the credentials:
| Field | Value | Example |
| ----------------------------------- | --------------------------------------- | -------------------------------------------------------------------------------------------------- |
| **Project Id** | Your GCP project ID | `my-project-123456` |
| **Workload Identity Pool Provider** | Full provider resource name from Step 7 | `projects/123456789/locations/global/workloadIdentityPools/mechcloud-pool/providers/mechcloud-idp` |
| **Service Account Email** | Service account email from Step 3 | `mechcloud-wif@my-project-123456.iam.gserviceaccount.com` |
7. Click **Save** to add the cloud account.
### Verifying the Setup
After adding the account, you can verify the integration by:
1. Navigate to **Infrastructure** -> **Discover Assets**.
2. Select your GCP account and a region.
3. Click **Discover** — if the setup is correct, you should see your GCP resources listed.
### Troubleshooting
| Issue | Solution |
| ---------------------------- | ------------------------------------------------------------------------------------- |
| **Permission denied** errors | Verify the service account has the required roles assigned in Step 3 |
| **Token exchange failed** | Check that the Issuer URL is exactly `https://id.mechcloud.io/` (with trailing slash) |
| **Audience mismatch** | Verify the audience value matches your JWT token's `aud` claim |
| **Subject mismatch** | Verify the attribute condition matches your JWT token's `sub` claim |
| **API not enabled** | Ensure all required APIs from Step 2 are enabled in your project |
# Azure
**Note** - Each of your Azure subscriptions must be onboarded as a separate account in MechCloud.
### **Step 1: Sign in to Azure Portal**
1. Open your web browser and navigate to the [Azure Portal](https://portal.azure.com/).
2. Sign in using your Azure account credentials.
### **Step 2: Register a New Application**
**Follow below instructions to create one application (service account) per every subscription whose assets you want to discover in MechCloud.**
1. In the Azure Portal, search for and select **Microsoft Entra ID**.
2. Under **Manage**, click on **App registrations**.
3. Click on **New registration** at the top.
4. Enter a name for your application/service account.
5. Choose **Accounts in this organizational directory only** under Supported account types.
6. Optionally, enter a Redirect URI if your application requires one. For most service accounts, this can be left blank.
7. Click **Register**.
### **Step 3: Add Federated Credentials**
MechCloud uses OpenID Connect (OIDC) federation to authenticate with Azure, eliminating the need for client secrets. This is more secure as there are no long-lived credentials to manage or rotate.
1. Once your application is registered, navigate to your application's overview page.
2. Select **Certificates & secrets** from the left-hand menu.
3. Click on the **Federated credentials** tab.
4. Click **Add credential**.
5. Select **Other issuer** under **Federated credential scenario**.
6. Fill in the following details:
| Field | Value | Description |
| ---------------------- | -------------------------- | -------------------------------------- |
| **Issuer** | `https://id.mechcloud.io/` | MechCloud's OIDC issuer URL |
| **Subject identifier** | Your MechCloud `sub` claim | Found in your JWT token (see below) |
| **Name** | `mechcloud-federation` | A descriptive name for this credential |
| **Audience** | Your MechCloud `aud` claim | Found in your JWT token (see below) |
#### Finding Your JWT Token Claims
To get the values for **Subject identifier** and **Audience**:
1. Log in to [MechCloud Portal](https://portal.mechcloud.io)
2. Open a new browser tab and navigate to: `https://portal.mechcloud.io/oauth2/auth1`
3. This displays your JWT token. Decode it using [jwt.io](https://jwt.io) or similar tool.
4. Find the following claims:
* **sub** (Subject) - Use this value for the **Subject identifier** field (e.g., `auth0|690895c8b0ac201506c31175`)
* **aud** (Audience) - Use this value for the **Audience** field (e.g., `n6dMQIo8ZCE5QxLY4o2KjeBaSn8eefTX`)
5. Click **Add** to save the federated credential.
### **Step 4: Assign Roles and Permissions**
1. Navigate to **Subscriptions** in the Azure Portal.
2. Select the subscription you want the service account to access.
3. Search for and click **Access control (IAM)** in left menu.
4. Click **Add** -> **Add role assignment**.
5. Choose the appropriate role(s) based on your needs:
* **Reader** - For read-only access to list resources
* **Contributor** - For Stateless IaC to create/update/delete resources
6. Search for and select the application you registered earlier.
7. Click **Save** to assign the role.
### **Step 5: Obtain Application (Client) ID and Tenant ID**
1. Go back to the **App registrations** page and select your application.
2. Copy the **Application (client) ID** and **Directory (tenant) ID** from the overview page.
### Step 6: Register your Azure account in MechCloud
1. Log on to [MechCloud](https://portal.mechcloud.io) and navigate to **Infrastructure** -> **Cloud Accounts**.
2. Select a team.
3. Select **Azure** under **Select a cloud provider** dropdown.
4. Click on **New Cloud Account** button.
5. Enter a name for your account.
6. Fill in the credentials:
* **Azure Tenant Id** - Enter the Directory (tenant) ID from Step 5.
* **Client Id** - Enter the Application (client) ID from Step 5.
* **Subscription Id** - Enter the subscription ID (from Azure Portal -> Subscriptions) that you associated with the service account in Step 4.
7. Click **Save** to add the cloud account.
# Configure Regions / Zones
1. Once you have added a cloud account, you will need to configure regions/zones for that account so that cloud assets in those regions/zones can be discovered.
2. Log on to [MechCloud](https://portal-preview.mechcloud.io) and navigate to **Infrastructure** -> **Cloud Accounts**.
3. Select a team.
4. Select a cloud provider under **Select a cloud provider** dropdown. This will display all the cloud accounts added for the selected cloud provider.
5. Click on three dots against a cloud account and click on **Configure Regions/Zones** option.
6. On the next screen click on on an availability zone to select a particular zone or click on region name to (de)select all the zones under that region.
7. Click on **Save** button.
# Discover Assets
Discover Assets provides a real-time region-aware visualization of your cloud infrastructure. Instead of navigating through individual cloud provider consoles you get a unified view of all resources across accounts, regions and zones from a single screen.
### Key Capabilities
**Visualize Your Cloud Footprint**
Discover Assets renders your infrastructure in a hierarchical layout that mirrors how cloud providers organize resources by region, zone, VPC and subnet. You can view your entire cloud footprint or narrow the scope to a specific [Resource Context](/cloud-computing/stateless-iac/resource-context) and a selected set of regions.
Each resource card displays key attributes such as machine type, IP addresses, attached disks and current state giving you instant visibility into what is running and what is stopped or terminated.
**Manage Resources Directly**
From the discovery view you can perform lifecycle operations on resources without switching to the cloud provider console. Operations like start, stop, reboot and delete are available both at the individual resource level and in bulk.
When deleting higher-level resources such as VPCs or subnets MechCloud automatically handles dependent resource cleanup. There is no need to manually order deletions or remove child resources first.
**Identify Waste**
Discover Assets helps you spot idle or orphaned resources like unattached disks, unused static IPs and stopped instances that continue to incur cost. You can remove these directly from the discovery UI with a single click.
### How to Use
1. Log on to [MechCloud](https://portal.mechcloud.io) and navigate to **Infrastructure > Discover Assets**.
2. Select a team.
3. Select one or more cloud accounts under the **Select cloud account** dropdown.
4. Optionally select a Resource Context and specific regions to narrow the scope.
5. Click **Show Discovered Assets** to display previously discovered assets for the selected accounts.
6. Click **Discover** to run a fresh discovery and update the asset inventory.
### Credential-Free Operation
MechCloud operates your cloud accounts without storing any credentials. There are no keys to manage or rotate. Authentication is handled through federated identity mechanisms specific to each cloud provider (OIDC for AWS, Workload Identity Federation for GCP, Service Principal for Azure).
### Cloud Provider Support
Discover Assets is available for the following cloud providers:
* [AWS](/cloud-computing/discover-assets/aws)
* [Azure](/cloud-computing/discover-assets/azure)
* [GCP](/cloud-computing/discover-assets/gcp)
# AWS
This page documents AWS-specific details for the Discover Assets feature.
### Prerequisites
* Your AWS account must be added to MechCloud using OIDC federation. Follow the [AWS onboarding guide](/cloud-computing/add-an-account/aws) to connect your account.
* The IAM role used by MechCloud must allow read access to the resources you want to discover. At minimum attach **AmazonEC2ReadOnlyAccess** for EC2 and VPC inventory.
### How Discovery Works
When you run Discover Assets against an AWS account MechCloud queries AWS APIs to enumerate resources across the selected regions. The results are rendered in a hierarchical view that reflects AWS's resource organization:
* **Regions** - top-level grouping (e.g. `us-east-1`, `eu-west-1`)
* **VPCs** - within each region
* **Subnets** - within each VPC
* **Instances** - resources scoped to a subnet or VPC
* **Regional resources** - resources scoped to a region such as Elastic IPs and EBS volumes
VPCs and subnets are displayed with their contained resources so you can see which EC2 instances sit inside which subnet and which EBS volumes are attached to which instance.
### Resource Cards
Each discovered resource is displayed as a card with key attributes:
**EC2 Instances**
* Instance type (e.g. `t3.medium`, `m6i.large`)
* Private and public IP addresses
* Attached EBS volumes
* Current state (`running`, `stopped`, `terminated`)
**EBS Volumes**
* Volume type (e.g. `gp3`, `gp2`, `io2`)
* Size in GB
* Attached instance (if any)
* Availability Zone
**Elastic IPs**
* Public IP address
* Associated resource (if any)
* Allocation status
### VPC Resources
The following resource types are displayed as VPC-level resources within each VPC:
* **Security Groups** - with group name and description
* **Internet Gateways** - with attachment state
* **NAT Gateways** - with state
* **VPN Connections** - with connection type
* **Transit Gateways** - with state
* **Load Balancers** - ALB, NLB and GLB with type indicator
* **RDS Instances** - with engine and instance class
* **RDS Clusters (Aurora)** - with engine
* **ElastiCache** - cache clusters and replication groups with engine and node type
* **EKS Clusters** - Kubernetes clusters
* **ECS Services** - Fargate services with task count
* **MSK Clusters** - Managed Kafka clusters with broker instance type
* **DynamoDB Tables** - with billing mode
* **S3 Buckets** - bucket name
* **Route53 Hosted Zones** - with public/private indicator (discovered in us-east-1 only)
### Lifecycle Operations
The following operations are available directly from the discovery view:
| Operation | Scope | Description |
| --------- | ------------------------------------------------- | -------------------------- |
| Start | EC2 Instance | Start a stopped instance |
| Stop | EC2 Instance | Stop a running instance |
| Reboot | EC2 Instance | Restart a running instance |
| Delete | EC2 Instance, EBS Volume, Elastic IP, VPC, Subnet | Remove the resource |
All operations are available at the individual resource level and in bulk.
**Cascading Deletes**: When deleting a VPC or subnet MechCloud automatically identifies and removes dependent resources such as EC2 instances, network interfaces, route table associations and security-group-bound resources in the correct order. No manual cleanup is required.
### Identifying Waste
Use Discover Assets to spot resources that are incurring cost without providing value:
* **Unattached EBS volumes** - volumes not attached to any EC2 instance continue to incur storage charges
* **Unused Elastic IPs** - allocated public IPs not associated with a running resource can still be billed
* **Stopped instances with attached volumes** - compute charges may stop, but EBS storage charges continue
These resources can be deleted directly from the discovery UI with a single click.
# Supported Resources
The following table lists all AWS resource types currently supported by the Discover Assets feature.
| Offering | Resource Type |
| ----------- | ------------------------------- |
| EC2 | VPC |
| | Subnet |
| | Instance (Virtual Machine) |
| | Volume (EBS) |
| | Elastic IP |
| | Security Group |
| | Internet Gateway |
| | NAT Gateway |
| | VPN Connection |
| | Transit Gateway |
| ECS | Service (Fargate) |
| EKS | Cluster |
| ElastiCache | Cache Cluster |
| | Replication Group |
| ELB | Load Balancer (ALB / NLB / GLB) |
| Lightsail | Instance |
| | Static IP |
| MSK | Managed Kafka Cluster |
| RDS | DB Instance |
| | DB Cluster (Aurora) |
| DynamoDB | Table |
| S3 | Bucket |
| Route53 | Hosted Zone |
# Azure
This page documents Azure-specific details for the Discover Assets feature.
### Prerequisites
* Your Azure subscription must be added to MechCloud using federated identity. Follow the [Azure onboarding guide](/cloud-computing/add-an-account/azure) to connect your subscription.
* The application registered for MechCloud must have at least the **Reader** role on the subscription to discover resources.
### How Discovery Works
When you run Discover Assets against an Azure subscription MechCloud queries Azure Resource Manager APIs to enumerate resources across the selected regions. The results are rendered in a hierarchical view that reflects Azure's resource organization:
* **Regions** - top-level grouping (e.g. `eastus`, `westeurope`)
* **Virtual networks** - within each region
* **Subnets** - within each virtual network
* **Compute resources** - resources such as virtual machines and managed disks
* **Regional resources** - resources scoped to a region such as public IPs and network interfaces
Virtual networks and subnets are displayed with their contained resources so you can see which virtual machines sit inside which subnet and which managed disks are attached to which VM.
### Supported Resources
See the [Supported Resources](/cloud-computing/discover-assets/azure/supported-resources) page for the complete list of Azure resource types supported by Discover Assets.
### Resource Cards
Each discovered resource is displayed as a card with key attributes:
**Virtual Machines**
* VM size (e.g. `Standard_B2s`, `Standard_D4s_v5`)
* Private and public IP addresses
* Attached managed disks
* Current power state
**Managed Disks**
* Disk SKU (e.g. `StandardSSD_LRS`, `Premium_LRS`)
* Size in GB
* Attached VM (if any)
**Public IPs**
* IP address
* Associated resource (if any)
* Allocation method and status
### Lifecycle Operations
The following operations are available directly from the discovery view:
| Operation | Scope | Description |
| --------- | --------------------------------- | --------------------------------- |
| Start | VM | Start a stopped virtual machine |
| Stop | VM | Stop a running virtual machine |
| Reboot | VM | Restart a running virtual machine |
| Delete | VM, Disk, Public IP, VNet, Subnet | Remove the resource |
All operations are available at the individual resource level and in bulk.
**Cascading Deletes**: When deleting a virtual network or subnet MechCloud automatically identifies and removes dependent resources such as VMs, NICs, disks and public IPs in the correct order. No manual cleanup is required.
### Identifying Waste
Use Discover Assets to spot resources that are incurring cost without providing value:
* **Unattached managed disks** - disks not attached to any VM continue to incur storage charges
* **Unused public IPs** - public IP addresses not associated with any active resource can still be billed
* **Stopped VMs with attached disks** - compute may stop billing depending on state, but managed disks continue to be billed
These resources can be deleted directly from the discovery UI with a single click.
# Supported Resources
The following table lists all Azure resource types currently supported by the Discover Assets feature.
| Offering | Resource Type |
| -------------------------- | ---------------------- |
| Microsoft.Compute | Virtual Machine |
| | Managed Disk |
| Microsoft.ContainerService | AKS Managed Cluster |
| Microsoft.Network | Virtual Network (VNet) |
| | Subnet |
| | Public IP Address |
| | Network Security Group |
| | Load Balancer |
| | NAT Gateway |
| Microsoft.Sql | SQL Database |
| Microsoft.DBforMySQL | Flexible Server |
| Microsoft.DBforPostgreSQL | Flexible Server |
| Microsoft.Cache | Azure Cache for Redis |
| Microsoft.Storage | Storage Account |
# GCP
This page documents GCP-specific details for the Discover Assets feature.
### Prerequisites
* Your GCP account must be added to MechCloud using Workload Identity Federation. Follow the [GCP onboarding guide](/cloud-computing/add-an-account/gcp) to connect your account.
* The service account must have **Compute Viewer** (`roles/compute.viewer`) and **Cloud Asset Viewer** (`roles/cloudasset.viewer`) roles on the project.
### How Discovery Works
When you run Discover Assets against a GCP account MechCloud queries the GCP APIs to enumerate resources across the selected regions and zones. The results are rendered in a hierarchical view that reflects GCP's resource organization:
* **Regions** - top-level grouping (e.g. `us-central1`, `europe-west1`)
* **Zones** - within each region (e.g. `us-central1-a`, `us-central1-b`)
* **Regional resources** - resources scoped to a region such as static external IPs and subnets
* **Zonal resources** - resources scoped to a zone such as VM instances and persistent disks
VPCs and subnets are displayed with their contained resources so you can see which VMs sit inside which subnet and which disks are attached to which VM.
### Supported Resources
See the [Supported Resources](/cloud-computing/discover-assets/gcp/supported-resources) page for the complete list of GCP resource types supported by Discover Assets.
### Resource Cards
Each discovered resource is displayed as a card with key attributes:
**VM Instances**
* Machine type (e.g. `e2-medium`, `n2-standard-4`)
* Internal and external IP addresses
* Attached disks
* Current state (running, stopped, terminated)
**Persistent Disks**
* Disk type (e.g. `pd-standard`, `pd-ssd`, `pd-balanced`)
* Size in GB
* Attached instance (if any)
**Static External IPs**
* IP address
* Associated resource (if any)
* Status (in use or reserved)
### Lifecycle Operations
The following operations are available directly from the discovery view:
| Operation | Scope | Description |
| --------- | ------------------------- | ----------------------------- |
| Start | VM | Start a stopped VM instance |
| Stop | VM | Stop a running VM instance |
| Reboot | VM | Restart a running VM instance |
| Delete | VM, Disk, IP, VPC, Subnet | Remove the resource |
All operations are available at the individual resource level and in bulk.
**Cascading Deletes**: When deleting a VPC or subnet MechCloud automatically identifies and removes dependent resources (VMs, disks, firewall rules etc.) in the correct order. No manual cleanup is required.
### Identifying Waste
Use Discover Assets to spot resources that are incurring cost without providing value:
* **Unattached persistent disks** - disks not attached to any VM continue to incur storage charges
* **Unused static IPs** - reserved external IPs not associated with any resource are billed by GCP
* **Stopped instances with attached disks** - the VM itself does not incur compute charges when stopped but attached disks continue to be billed
These resources can be deleted directly from the discovery UI with a single click.
### Demo
{% embed url="" %}
# Supported Resources
The following table lists all GCP resource types currently supported by the Discover Assets feature.
| Offering | Resource Type |
| -------------- | ------------------------------------------ |
| Compute Engine | Network (VPC) |
| | Subnetwork |
| | Firewall |
| | Instance (VM) |
| | Disk (Persistent Disk) |
| | Address (Static External IP) |
| | Forwarding Rule (Load Balancer) |
| GKE | Cluster |
| | Node Pool |
| Cloud SQL | Instance (MySQL / PostgreSQL / SQL Server) |
| Memorystore | Redis Instance |
| Cloud Storage | Bucket |
# Real-time Visualization
In order to visualize your cloud assets across hyperscalers in real time (e.g. you create a vpc using cli or terraform and it shows up in MechCloud in few seconds without you triggering the discovery manually), you will need to post your hyperscaler events to a certain endpoint of MechCloud. Here are the details of this endpoint -
**Url** -
**Query parameter(s)**
* **cloudAccountId** - This is the unique id which is generated by MechCloud when you register a cloud account. You can get this from MechCloud console -> Infrastructure -> Cloud Accounts page.
**Headers**
* **Mc-Team-Id** - This is the id generated by MechCloud for a team which a cloud account belongs to. Its value is **d65e32d2-e18f-49a7-8cbf-e19205772ea0** for the default team.
* **Referer** -
* **Content-Type** - application/json
* **Authorization** - Bearer \
* Once you are logged into MechCloud, simply open a new tab, and enter url in the address bar. It will print your access/jwt token.
**Response code(s)**
* Any response with 200 status code means event was processed or was a duplicate event and so you can remove such event from the queue.
* For any other status code, you can retry it 2-3 times to see if it goes through. If not, then pause the mechanism which is posting events to MechCloud and post your issue in the MechCloud discord server.
**It is your responsibility to make sure that events are posted in the correct order. E.g. you should not post an event corresponding to a subnet to MechCloud when the event corresponding to its parent vpc creation has not been posted yet.**
Before you can invoke this endpoint, you will need to get a jwt token for your MechCloud account. To fetch you jwt token, make sure you are logged into MechCloud and then enter in a new browser tab. It will fetch your jwt token and display it. Copy this jwt token and replace \ placehoder in **Authorization** header with it.
How to post hyperscaler specific events to MechCloud and the format of these events is described in the respective hyperscaler section under this page.
In order to visualize your hyperscaler assets, first you need to follow the instructions under the respective hyperscale section, navigate to **Infrastructure -> Discover Assets** in the MechCloud portal**,** select one or more AWS accounts under **Select cloud accounts** dropdown and then click on **Enable Real-time updates** button. Now go ahead and create a vpc/subnet/vm as per the instruction mentioned in the respective hyperscaler section, make sure it is posted to MechCloud and you get a success response for same. It will then appear on MechCloud UI within few seconds.
**Real-time updates are streamed for 25 mins only after enabling it from UI and disabled at the end of this duration automatically. You will need to enable it again if you want to stream real-time updates after it is disabled automatically.**
# AWS
**Real-time visualization is only supported for vpc, subnet and virtual server resource types as of today.**
### Details
There are two options available to visualize AWS resources in real-time -
* First option is based on **Tags**. **This option is already supported as of today.**
* Second option is based on **CloudTrail**. **This option is also supported as of today.**
### **Choosing between Tags and CloudTrail**
#### **CloudTrail**
* This is recommended for new / greenfield resources provided you are comfortable with following cons -
* It takes some time before an event appears in event history and so this process is slower compared to tags-based approach for real-time visualization.
* A trail does not provide any advanced filters to excludes all the events other than the one you are interested in. So, it will be capturing a large number of events in the S3 bucket associated with the trail where many of such events will not be processed by the eventbridge rule required for real-time visualization.
* To consume cloudtrail events using eventbridge, you are required to create at least one trail. However, if you are having more than one trails **then you can't select only one of such trails while creating an eventbridge rule** which will forward cloudtrail events to an SQS queue. This could be confusing.
#### **Tags**
* This option is recommended for existing / brownfield resources and in fact, it is the only option which will work for existing / brownfield resources. However, it can be used for newly created resources as well.
* This option requires that you add a tag called **Mc-Asset-Name** to all the resources either at the time of creation or post creation so that it can be discovered in MechCloud in real-time.
### Configure sync mechanism for a cloud account
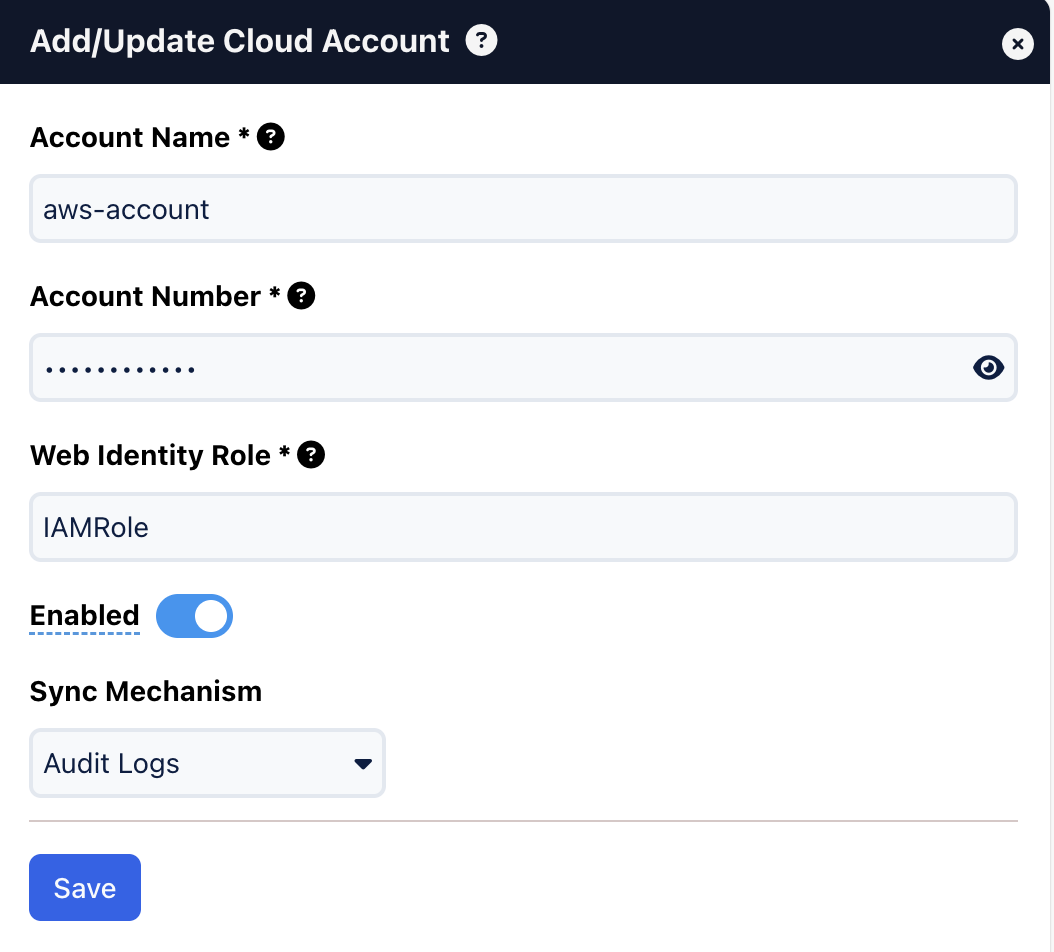
* Navigate to **MechCloud console -> Infrastructure -> Cloud Accounts** page.
* Add an account or update an existing account and choose desired sync mechanism as shown below -
### Steps
Both the mechanism requires to define a lambda function and a FIFO queue. Steps for setting up these are described below. Sync mechanism specific steps are described under respective page.
#### 1. Create a Lambda function
Create a python lambda function with the following details -
* **Name** - push-mgmt-events-to-mechcloud
* **Runtime** - Python 3.12
* **Code**
```python
import json
import requests
import os
def lambda_handler(event, context):
print(event)
for record in event['Records']:
message_body = json.loads(record['body'])
team_id = os.environ.get('TEAM_ID')
if not team_id:
raise ValueError("TEAM_ID environment variable is missing")
cloud_account_id = os.environ.get('CLOUD_ACCOUNT_ID')
if not cloud_account_id:
raise ValueError("ACCOUNT_ID environment variable is missing")
access_token = os.environ.get('ACCESS_TOKEN')
if not access_token:
raise ValueError("ACCESS_TOKEN environment variable is missing")
endpoint_url = f"https://portal-api.mechcloud.io/mechcloud-turbine-discovery/v1.0/sync/events?cloudAccountId={cloud_account_id}"
headers = {
'Authorization': f"Bearer {access_token}",
'Mc-Team-Id': f"{team_id}",
'Referer': 'https://portal.mechcloud.io/',
'Content-Type': 'application/json'
}
try:
response = requests.post(
endpoint_url,
headers=headers,
timeout=(5, 30),
data=json.dumps(message_body)
)
response.raise_for_status()
print(f"Message pushed successfully: {response.text}")
except requests.exceptions.RequestException as e:
print(f"Error pushing message: {e}")
```
* Make sure you have following environment variables defined under **Configuration -> Environment variables** -
* **TEAM\_ID** - This is the id generated by MechCloud for a team which a cloud account belongs to. Its value is **d65e32d2-e18f-49a7-8cbf-e19205772ea0** for the default team.
* **CLOUD\_ACCOUNT\_ID** - This is the unique id which is generated by MechCloud when a cloud account is registered. You can get this from **MechCloud console -> Infrastructure -> Cloud Accounts** page.
* **ACCESS\_TOKEN** - Once you are logged into MechCloud, simply open a new tab, and enter url in the address bar. It will print your access token.
* Update timeout to 30 seconds under **Configuration -> General Configuration -> Timeout**.
#### 2. Create a layer with python dependencies
Create a layer using instructions available at with the following configuration and upload it under **Layers** section of the lambda function created in previous step -
**Python version** - 3.12
**Lambda dependencies**
```
requests==2.32.3
```
#### 3. Create a FIFO queue
Create a fifo queue with following details -
* **Name** - management-events.fifo
* **Type** - FIFO
* Make sure **Content-based deduplication** is enabled.
* You can adjust other settings as per your need.
* Configure the lambda function created in previous step under **Lambda triggers** of this queue.
#### 4. Create an Event Bridge rule
Create an event bridge rule with the following details -
* **Define rule detail**
* **Name** - mc-instance-state-change-events
* **Event bus** - default
* Make sure that **Enable the rule on the selected event bus** is enabled.
* Select **Rule with an event pattern** under **Rule type**.
* **Build event pattern**
* **Creation method** - Custom pattern (JSON editor)
* **Event pattern**
```json
{
"source": ["aws.ec2"],
"detail-type": ["EC2 Instance State-change Notification"]
}
```
* **Select target(s)**
* **Target 1**
* **Target types -** AWS service
* **Select a target** - SQS Queue
* **Queue** - management-events.fifo
* **Message group ID** - mc-instance-state-change-events
# Tags
### **Introduction**
**Real-time visualization is only supported for vpc, subnet and virtual server resource types as of today.**
AWS does not provide dedicated events when a vpc/subnet/vm is created. So MechCloud achieves this with the help of tags. It means you will need to create a vpc/subnet/vm with a tag named **Mc-Asset-Name** or add this tag to an existing vpc/subnet/vm so that these can be discovered by MechCloud automatically as soon as these are created.
This will generate events in the following formats for various resource types -
**Note** **- Only mandatory attributes have been shown below for various events. You can remove all the attributes other than ones mentioned below (using eventbridge pipe etc) so that any sensitive information (e.g. account number) about your account is NOT posted to MechCloud.**
### Events
#### **1. Create Vpc**
```json
{
"detail-type": "Tag Change on Resource",
"source": "aws.tag",
"region": "ap-south-1",
"resources": [
"arn:aws:ec2:ap-south-1:0123456789:vpc/vpc-12345"
],
"detail": {
"changed-tag-keys": [
"Mc-Asset-Name"
],
"service": "ec2",
"resource-type": "vpc",
"tags": {
"Mc-Asset-Name": "vpc3"
}
}
}
```
#### 2. Delete Vpc
```json
{
"detail-type": "Tag Change on Resource",
"source": "aws.tag",
"region": "ap-south-1",
"resources": [
"arn:aws:ec2:ap-south-1:0123456789:vpc/vpc-12345"
],
"detail": {
"changed-tag-keys": [
"Mc-Asset-Name"
],
"service": "ec2",
"resource-type": "vpc",
"tags": {
"Name": "vpc1"
}
}
}
```
#### 3. Create Subnet
```json
{
"detail-type": "Tag Change on Resource",
"source": "aws.tag",
"region": "ap-south-1",
"resources": [
"arn:aws:ec2:ap-south-1:0123456789:subnet/subnet-12345"
],
"detail": {
"changed-tag-keys": [
"Mc-Asset-Name"
],
"service": "ec2",
"resource-type": "subnet",
"tags": {
"Mc-Asset-Name": "vpc2-subnet1"
}
}
}
```
#### 4. Delete Subnet
```json
{
"detail-type": "Tag Change on Resource",
"source": "aws.tag",
"region": "ap-south-1",
"resources": [
"arn:aws:ec2:ap-south-1:0123456789:subnet/subnet-12345"
],
"detail": {
"changed-tag-keys": [
"Mc-Asset-Name"
],
"service": "ec2",
"resource-type": "subnet",
"tags": {
"Name": "vpc2-subnet1"
}
}
}
```
#### 5. Create VM
```json
{
"detail-type": "Tag Change on Resource",
"source": "aws.tag",
"region": "ap-south-1",
"resources": [
"arn:aws:ec2:ap-south-1:0123456789:instance/i-12345"
],
"detail": {
"changed-tag-keys": [
"Mc-Asset-Name"
],
"service": "ec2",
"resource-type": "instance",
"tags": {
"Mc-Asset-Name": "Amazon Linux 1"
}
}
}
```
#### 6. Delete VM
```json
{
"detail-type": "Tag Change on Resource",
"source": "aws.tag",
"region": "ap-south-1",
"resources": [
"arn:aws:ec2:ap-south-1:0123456789:instance/i-12345"
],
"detail": {
"changed-tag-keys": [
"Mc-Asset-Name"
],
"service": "ec2",
"resource-type": "instance",
"tags": {
"Name": "Amazon Linux 1"
}
}
}
```
#### 7. Stopping VM
```json
{
"detail-type": "EC2 Instance State-change Notification",
"source": "aws.ec2",
"region": "ap-south-1",
"resources": [
"arn:aws:ec2:ap-south-1:0123456789:instance/i-12345"
],
"detail": {
"instance-id": "i-12345",
"state": "stopping"
}
}
{
"detail-type": "EC2 Instance State-change Notification",
"source": "aws.ec2",
"region": "ap-south-1",
"resources": [
"arn:aws:ec2:ap-south-1:0123456789:instance/i-12345"
],
"detail": {
"instance-id": "i-12345",
"state": "stopped"
}
}
```
#### 8. Starting VM
```
{
"detail-type": "EC2 Instance State-change Notification",
"source": "aws.ec2",
"region": "ap-south-1",
"resources": [
"arn:aws:ec2:ap-south-1:0123456789:instance/i-12345"
],
"detail": {
"instance-id": "i-12345",
"state": "pending"
}
}
{
"detail-type": "EC2 Instance State-change Notification",
"source": "aws.ec2",
"region": "ap-south-1",
"resources": [
"arn:aws:ec2:ap-south-1:0123456789:instance/i-12345"
],
"detail": {
"instance-id": "i-12345",
"state": "running"
}
}
```
Here are the steps to configure various things in AWS console to generate these events and then post these events to MechCloud endpoint described in the parent page of this page. There may be better ways to achieve this and so choose a mechanism which you feel is most suitable for achieving this. **As far as you are posting the events in the above format and to a dedicated MechCloud endpoint, it should work irrespective of the way to achieve this. As better ways to achieve this may appear in future, you can use any generative AI tool (e.g. bard) to figure out a better mechanism to achieve this at any point in time.**
### Steps
#### 1. Create an Event Bridge rule
Create an event bridge rule with the following details -
* **Define rule detail**
* **Name** - mc-tags-events
* **Event bus** - default
* Make sure that **Enable the rule on the selected event bus** is enabled.
* Select **Rule with an event pattern** under **Rule type**.
* **Build event pattern**
* **Creation method** - Custom pattern (JSON editor)
* **Event pattern**
```json
{
"source": [
"aws.tag"
],
"detail-type": [
"Tag Change on Resource"
],
"detail": {
"changed-tag-keys": [
"Mc-Asset-Name",
"Name"
],
"service": [
"ec2"
],
"resource-type": [
"vpc",
"subnet",
"instance"
]
}
}
```
* **Select target(s)**
* **Target 1**
* **Target types -** AWS service
* **Select a target** - SQS Queue
* **Queue** - management-events.fifo
* **Message group ID** - mc-tags-events
# CloudTrail
### Events
**Note** **- Only mandatory attributes have been shown below for various events. You can remove all the attributes other than ones mentioned below (using eventbridge pipe etc) so that any sensitive information (e.g. account number) about your account is NOT posted to MechCloud.**
#### 1. Create Vpc
```json
{
"detail": {
"eventSource": "ec2.amazonaws.com",
"eventName": "CreateVpc",
"awsRegion": "ap-south-1",
"responseElements": {
"vpc": {
"vpcId": "vpc-0cccf79ebe39e344d"
}
}
}
}
```
#### 2. Delete Vpc
```json
{
"detail": {
"eventSource": "ec2.amazonaws.com",
"eventName": "DeleteVpc",
"awsRegion": "ap-south-1",
"requestParameters": {
"vpcId": "vpc-0578af3ad4c046a4c"
}
}
}
```
#### 3. Create Subnet
```json
{
"detail": {
"eventSource": "ec2.amazonaws.com",
"eventName": "CreateSubnet",
"awsRegion": "ap-south-1",
"responseElements": {
"subnet": {
"subnetId": "subnet-0ecb030bb9dff28df"
}
}
}
}
```
#### 4. Delete Subnet
```json
{
"detail": {
"eventSource": "ec2.amazonaws.com",
"eventName": "DeleteSubnet",
"awsRegion": "ap-south-1",
"requestParameters": {
"subnetId": "subnet-0f04fcf48a46f8be6"
}
}
}
```
#### 5. Create VM
```json
{
"detail": {
"eventSource": "ec2.amazonaws.com",
"eventName": "RunInstances",
"awsRegion": "ap-south-1",
"responseElements": {
"instancesSet": {
"items": [
{
"instanceId": "i-0f376f70fbeb82fde"
}
]
}
}
}
}
```
#### 6. Delete VM
```json
{
"detail": {
"eventSource": "ec2.amazonaws.com",
"eventName": "TerminateInstances",
"awsRegion": "ap-south-1",
"requestParameters": {
"instancesSet": {
"items": [
{
"instanceId": "i-0f034f129e90fff61"
}
]
}
}
}
}
```
### Steps
#### 1. Create a trail
* Navigate to **CloudTrail -> Trails**.
* Click on **Create trail** button to create a new trail with following details. This describes only few settings. You can adjust other settings as per your needs.
* **General Details**
* **Trail name** - mc-mgmt-events
* (Optional) Make sure that **Enable for all accounts in my organization** option is **UNCHECKED as selecting this may result in huge charges.**
* **Events**
* **Event type** - Make sure ONLY Management events option is CHECKED.
* **Management events**
* Make sure only **Write** is CHECKED.
* Make sure both **Exclude AWS KMS events** and **Exclude Amazon RDS Data API events** are CHECKED.
* Select newly created trail and click on **Stop logging** button so that unnecessary events are NOT logged in the S3 button associated with the trail. **A good practice is to enable logging for this trail just before real-time visualization starts and disable it at the end of real-time visualization.**
#### 2. Create an Event Bridge rule
Create an event bridge rule with the following details -
* **Define rule detail**
* **Name** - mc-cloudtrail-events
* **Event bus** - default
* Make sure that **Enable the rule on the selected event bus** is enabled.
* Select **Rule with an event pattern** under **Rule type**.
* **Build event pattern**
* **Creation method** - Custom pattern (JSON editor)
* **Event pattern**
```json
{
"source": [
"aws.ec2"
],
"detail-type": [
"AWS API Call via CloudTrail"
],
"detail": {
"eventSource": [
"ec2.amazonaws.com"
],
"eventName": [
"CreateVpc",
"DeleteVpc",
"CreateSubnet",
"DeleteSubnet",
"RunInstances",
"StartInstances",
"StopInstances",
"RebootInstances",
"TerminateInstances"
]
}
}
```
* **Select target(s)**
* **Target 1**
* **Target types -** AWS service
* **Select a target** - SQS Queue
* **Queue** - management-events.fifo
* **Message group ID** - mc-cloudtrail-events
# GCP
**Real-time visualization is only supported for vpc, subnet and virtual server resource types as of today (Feb 08, 2024).**
### Changelog
#### Feb 8, 2024
* Created initial version descripting steps for setting up real-time visualization of GCP assets (vpc, subnet and vm).
#### Feb 10, 2024
* Updated instructions.
### Steps for setting up real-time updates
#### 1. Create a topic
* Go to console -> topics (use search bar to jump to this).
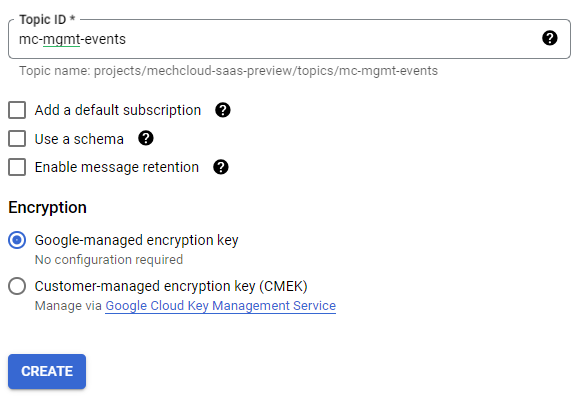
* Add a topic with **mc-mgmt-events** id (see below screenshot for other details)
* Click on newly created topic in the list of topics and then click on **TRIGGER CLOUD FUNCTION** link.
* Create a function with details as follows -
* **Basics**
* Environment - 2nd gen
* Function name - process-mc-events
* Region - Choose a region of your choice
* **Trigger** - Leave it unchanged ( make sure it is having topic created in the previous step selected under **Cloud Pub/Sub topic** field.
* **Runtime, build, connections and security settings (Choose other settings as per your convenience)**
* **Runtime**
* **Timeout -** 30 seconds
* **Runtime environment variables** -
* **TEAM\_ID** - d65e32d2-e18f-49a7-8cbf-e19205772ea0
* **CLOUD\_ACCOUNT\_ID** - You can get this from **MechCloud console -> Infrastructure -> Cloud Accounts** page.
* **ACCESS\_TOKEN** - Once you are logged into MechCloud, simply open a new tab, and enter url in the address bar. It will print your access/jwt token.
* **Connections**
* Ingress Settings **-** Allow internal traffic only
* **Source code**
* **Runtime** - Python 3.12
* **Entry point** - process\_event
* **Source code** - Inline editor
* Make sure requirements.txt has following additional modules -
* requests==2.31.0
* Add following code under main.py file-
```python
import functions_framework, json, logging, base64, os, requests
@functions_framework.cloud_event
def process_event(cloud_event):
try:
print(cloud_event)
event = base64.b64decode(cloud_event.data["message"]["data"])
event_str = event.decode('utf-8')
print('Event : ' + event_str)
event_json = json.loads(event)
service_name = event_json['protoPayload']['serviceName']
method_name = event_json['protoPayload']['methodName']
print("Service : '{}', Method : '{}'".format(service_name, method_name))
team_id = os.environ.get('TEAM_ID')
if not team_id:
raise ValueError("TEAM_ID environment variable is missing")
cloud_account_id = os.environ.get('CLOUD_ACCOUNT_ID')
if not cloud_account_id:
raise ValueError("ACCOUNT_ID environment variable is missing")
access_token = os.environ.get('ACCESS_TOKEN')
if not access_token:
raise ValueError("ACCESS_TOKEN environment variable is missing")
endpoint_url = f"https://mechcloud-preview-asia.mechcloud.io/mechcloud-turbine-discovery/v1.0/sync/events?cloudAccountId={cloud_account_id}"
headers = {
'Authorization': f"Bearer {access_token}",
'Mc-Team-Id': f"{team_id}",
'Referer': 'https://portal-preview.mechcloud.io/',
'Content-Type': 'application/json'
}
response = requests.post(
endpoint_url,
headers=headers,
timeout=(5, 30),
data=event_str
)
status_code = response.status_code
print('Status code : ' + str(status_code))
print('Response : ' + response.text)
if status_code == 200:
return f"OK"
else:
return f"Not OK"
except Exception as ex:
print('Exception occured.')
logging.error(ex, exc_info=True)
return f"Not OK"
```
#### 2. Create log routing sinks
To visualize GCP resource in real-time, we will need to create one log routing sink per resource type (e.g. vpc). You can add a log routing sink by going to console -> logging (use search bar to jump to this) -> Log router and click on **Create sink** link to add a sink. Make sure you have following log routing sinks created -
Sink Name
Sink Destination
Logs to include in sink
mc-vpc-mgmt-events
Service - Cloud Pub/Sub topic Topic - projects/<project_name>/topics/mc-mgmt-events
resource.type="gce_network" protoPayload.methodName="beta.compute.networks.insert" OR protoPayload.methodName="v1.compute.networks.insert" OR protoPayload.methodName="beta.compute.networks.delete" OR protoPayload.methodName="v1.compute.networks.delete"
mc-subnet-mgmt-events
Service - Cloud Pub/Sub topic Topic - projects/<project_name>/topics/mc-mgmt-events
resource.type="gce_subnetwork" protoPayload.methodName="beta.compute.subnetworks.insert" OR protoPayload.methodName="v1.compute.subnetworks.insert" OR protoPayload.methodName="beta.compute.subnetworks.delete" OR protoPayload.methodName="v1.compute.subnetworks.delete"
mc-vm-mgmt-events
Service - Cloud Pub/Sub topic Topic - projects/<project_name>/topics/mc-mgmt-events
resource.type="gce_instance" protoPayload.methodName="beta.compute.subnetworks.insert" OR protoPayload.methodName="v1.compute.instances.insert" OR protoPayload.methodName="beta.compute.instances.delete" OR protoPayload.methodName="v1.compute.instances.delete" OR protoPayload.methodName="beta.compute.instances.start" OR protoPayload.methodName="v1.compute.instances.start" OR protoPayload.methodName="beta.compute.instances.stop" OR protoPayload.methodName="v1.compute.instances.stop"
# Cloud Accounts
# Stateless IaC
Stateless IaC is about managing infrastructure without state files unlike other tools/platforms (e.g. terraform) which heavily rely on state files to manage infrastructure. **MechCloud is the only DevOps platform supports this along with Real-time pricing.**
**Blog post** -
#### **Advantages of Stateless Approach**
* **No state files to manage**\
Eliminates corruption, drift, and lock issues.
* **Real-time cloud accuracy**\
Always reflects actual cloud resources.
* **Faster collaboration**\
Multiple engineers can deploy simultaneously.
* **Instant compatibility with new cloud features**\
No provider lag.
* **Simpler onboarding**\
No backend setup, imports, or refresh steps.
* **Lower operational overhead**\
No backups, migrations, or state storage.
* **More secure**\
Removes sensitive state file handling and access requirements.
# Resource Context
The **resource context** in MechCloud will be equivalent to a Kubernetes namespace, serving as a logical container for a group of resources that should be managed as a single unit. It will allow you to:
* **Group Related Resources**: Resources within the same resource context (e.g., app1-prod) will be treated as a cohesive set, isolating them from other resources in the same AWS account.
* **Simplify Multi-Environment Management**: Define separate contexts for different environments of an application. For example, for an application named app1, you might use:
* `app1-prod` for the production environment.
* `app1-dev` for the development environment.
* `app1-stage` for the staging environment.
When using MechCloud SaaS, you will select the resource context from a dropdown, and only resources within that context will be included in the actual state and plan. This will ensure focused and organized infrastructure management across multiple environments.
### Creating a resource context
Follow these steps to create a resource context in MechCloud -
* Log on to [MechCloud](https://portal-preview.mechcloud.io) and navigate to **Infrastructure** -> **Resource Contexts**.
* Select a team.
* Click on **New Resource Context** button.
* Enter a name for the resource context.
* Click on **Save** button to create the resource context.
# Resource Attribute Aliases
Resource Attribute Aliases let you define shorthand names and default values for resource properties, making your desired state templates shorter and more readable.
### Overview
When authoring desired state YAML, certain resource properties require long or hard-to-remember values (e.g., Azure VM image references, disk SKUs). Instead of looking these up every time, you can define aliases that map a friendly name to the actual value, and set default values for properties you use frequently.
### How It Works
Aliases are configured per **team**, **cloud provider**, and **resource type**. Each alias mapping has three fields:
| Field | Description |
| ------------- | ------------------------------------------------------------------------------------------- |
| **Attribute** | The resource property path (e.g., `storage_profile.image_reference`) |
| **Alias** | A short, memorable name you can use in templates (e.g., `ubuntu-arm64`) |
| **Default** | A default value applied automatically if the property is not specified in the desired state |
### Managing Aliases
Navigate to **Infrastructure → Stateless IaC Aliases** in the MechCloud console.
1. Select a **Team** and **Cloud Provider**
2. Click **New Alias** to create a mapping for a resource type
3. Define one or more attribute mappings with alias names and/or default values
4. Click **Save**
### Supported Providers
Aliases are available for all cloud providers that support Stateless IaC:
* **AWS** — e.g., AMI aliases (see [Resource Id Aliases](https://github.com/pistonportal/gitbook-mechcloud/blob/main/cloud-computing/stateless-iac/common-concepts.md#resource-id-aliases) for the `{{Image|alias}}` syntax)
* **Azure** — e.g., VM image references, disk types, VM sizes
* **GCP** — e.g., machine types, disk types, image families
### Benefits
* **Shorter templates** — Replace verbose property values with short alias names
* **Consistency** — Default values ensure all resources of a type use the same base configuration
* **Less errors** — No need to look up exact values for common properties
* **Team-scoped** — Each team can define their own aliases matching their standards
# Importing Resources
The Import feature lets you bring existing cloud resources under MechCloud Stateless IaC management by converting the actual state into a desired state YAML template.
### Overview
If you have resources already running in your cloud account that were created manually (via console, CLI, or other tools), you can import them into MechCloud's Stateless IaC. The import reads the actual state of your resources and generates a desired state YAML that you can use as a starting point.
### How to Import
1. Navigate to **Infrastructure → Stateless IaC**
2. Select your **Team**, **Cloud Provider**, **Cloud Account**, **Context**, and **Region**
3. The **Actual State** panel on the right shows your current cloud resources
4. Click the **Import** button (arrow icon) in the Actual State panel header
5. MechCloud fetches the actual state and converts it into desired state YAML
6. The generated YAML appears in the **Desired State** editor on the left
### What Happens During Import
* MechCloud queries your cloud account for all resources in the selected context and region
* Resources are converted to the MechCloud YAML format with `snake_case` properties
* Cross-resource references are resolved to `ref:` syntax where possible
* The generated YAML is placed in the Desired State editor, replacing any existing content
### After Import
Once the desired state is populated:
1. **Review the YAML** — Check that all resources and properties look correct
2. **Click Plan** — Generate a plan to compare desired vs actual state
3. **Verify "none" actions** — All resources should show `action: none` since they already exist
4. **Customize** — Modify the YAML to add, update, or remove resources as needed
5. **Apply changes** — Use the normal Plan → Apply workflow for any modifications
### Use Cases
* **Adopting IaC for existing infrastructure** — Bring manually created resources under IaC management
* **Template generation** — Use import as a starting point for new templates based on existing setups
* **Disaster recovery** — Capture the current state as a template that can recreate the infrastructure
### Supported Providers
Import is available for all cloud providers that support Stateless IaC:
* **AWS**
* **Azure**
* **GCP**
### Limitations
* Import captures the current state at the time of import — it does not track ongoing changes
* Some provider-specific properties may not be fully captured (e.g., tags, metadata)
* The generated YAML may need manual adjustments for optimal readability
# Deleting resources
In order to delete all the resources under a context, simply specify `resources: []` as desired state and execute the usual plan -> apply commands.
# AWS
MechCloud's Stateless Infrastructure as Code (IaC) for AWS enables you to declaratively manage your AWS resources without relying on state files, eliminating common issues like state drift. By defining your desired infrastructure in YAML and comparing it directly against your live AWS environment, you can provision, update, and delete resources with confidence. This feature supports a wide range of AWS EC2 resources (e.g., VPCs, subnets, security groups, instances) and integrates real-time pricing to provide proactive cost insights during planning.
For details on resource contexts (equivalent to Kubernetes namespaces for scoping resources), see the Resource Contexts documentation.
### Key Concepts
#### Desired State
The desired state is your YAML blueprint describing the infrastructure you want. It's hierarchical, using nesting to define parent-child relationships (e.g., a subnet inside a VPC).
**Requirements**:
* Each resource must have a **unique relative path** based on its hierarchy (e.g., vpc1/subnet1/instance1), similar to a Linux file path. This is your responsibility to ensure uniqueness and prevent conflicts.
* Use `snake_case` for all properties (e.g., cidr\_block instead of CidrBlock).
* No explicit parent references (e.g., no vpc\_id for a subnet—MechCloud infers from hierarchy).
* References:
* **Sibling references** (same parent): ref:\ (e.g., ref:sg1).
* **Non-sibling references** (cross-hierarchy): ref:\ (e.g., ref:vpc1/sg1).
#### Actual State
The actual state is a real-time snapshot of your AWS resources in the selected context, formatted to match the desired state structure (hierarchical, snake\_case properties). It includes resource types, names, identifiers (e.g., vpc-12345678), and properties.
#### Plan
The plan compares desired and actual states, proposing actions:
* **Create**: New resources.
* **Update**: In-place changes.
* **Recreate**: When at least one immutable property differs (requires delete + create).
* **Delete**: Remove extra resources.
* **None**: No changes needed.
Plans show hierarchy with indentation (-- for children) and include real-time pricing for compute/storage resources (hourly/monthly costs, % change).
# Real-time Pricing
MechCloud displays cost information directly in the plan output before any infrastructure changes are applied. This enables cost-aware infrastructure decisions during development rather than discovering costs after deployment.
### Overview
When generating an execution plan, MechCloud calculates and displays comprehensive cost information for AWS resources that have associated costs.
### Supported Billing Models
| Model | How it appears in the plan | Examples |
| -------------------- | --------------------------------------------- | ------------------------------------------------------ |
| Usage-based (hourly) | Hourly rate + max monthly total (744 hours) | EC2, RDS, Lambda duration, NAT Gateway |
| Storage (GB-month) | Rate + total when size is known | EBS, S3, RDS storage, DynamoDB storage |
| Consumption-based | Rate only (actual usage unknown at plan time) | Lambda requests, DynamoDB on-demand, data transfer out |
#### Usage-Based Charges (Price + Cost)
For resources with **predictable usage patterns**, MechCloud shows both price rates and calculated costs:
* EC2 instance hours
* RDS database hours
* EBS volume storage (GB-Mo)
* Load balancer hours
* NAT Gateway hours
Example: An EC2 `t3.nano` instance shows `price: $0.00520/Hrs, monthly: $3.87`
**EC2 Spot Pricing**: For all on-demand EC2 instances, MechCloud displays both on-demand and spot pricing in the plan output. This helps users evaluate potential cost savings by using spot instances when suitable for their workloads.
Example: `vm1 (action: create, price: $0.00520/Hrs, monthly: $3.87, spot-price: $0.00160/Hrs, spot-monthly: $1.19)`
#### Consumption-Based Charges (Price Only)
For resources with **variable consumption**, MechCloud shows pricing rates but cannot calculate costs without actual usage data:
* Data transfer (GB)
* DynamoDB requests (Million-WRU, Million-RRU)
* S3 requests
* Lambda invocations
* API Gateway requests
* NAT Gateway data processing (GB)
**Example**: DynamoDB write request units pricing shown as `Price (Write request units - price: $0.625/Million-WRU)`
### Cost Change Tracking
MechCloud displays cost change percentages for all resource actions, helping you understand the financial impact of infrastructure changes.
#### Create Actions
When creating new resources, the cost change is **+100%** (from $0 to the new cost):
```
vm1 (action: create, price: $0.00520/Hrs, monthly: $3.87, change: +100%)
```
#### Update Actions
When modifying existing resources, the change percentage reflects the actual cost difference.
**Example: Downsizing an instance from t3.medium to t3.small**
```
vm1 (action: update, price: $0.0208/Hrs, monthly: $15.19, change: -50%)
```
The -50% change indicates a 50% cost reduction from the previous `t3.medium` configuration.
**Example: Increasing DynamoDB write capacity from 25 to 35 WCU**
```
provisioned_table (action: update)
=> Price (Write capacity units)
=> Tier 1 (First 25 WCU - price: $0.00/WCU-Hrs, quantity: 25, monthly: $0.00, change: 0%)
=> Tier 2 (Beyond 25 WCU - price: $0.00065/WCU-Hrs, quantity: 10, monthly: $4.84, change: +100%)
```
The +100% change shows new costs since previously all 25 WCU were in the free tier.
#### Delete Actions
When deleting resources, the cost change is **-100%** (from current cost to $0):
```
vm1 (action: delete, price: $0.00/Hrs, monthly: $0.00, change: -100%)
```
### Plan Output Examples
#### EC2 Instance (Usage-Based Charges)
EC2 instances have predictable usage patterns, so MechCloud calculates and displays actual hourly and monthly costs.
**Creating an on-demand EC2 instance:**
```yaml
resources:
- type: aws_ec2_launch_template
name: template1
props:
launch_template_name: "template1"
launch_template_data:
instance_type: "t3.nano"
image_id: "ami-0bc691261a82b32bc"
- type: aws_ec2_instance
name: vm1
props:
launch_template:
launch_template_id: "ref:template1"
version: "1"
```
**Plan output:**
```
template1 (action: create)
vm1 (action: create, price: $0.00520/Hrs, monthly: $3.87, spot-price: $0.00160/Hrs, spot-monthly: $1.19, change: +100%)
```
The plan shows:
* **On-demand price**: `$0.00520/Hrs` - calculated hourly cost for t3.nano instance
* **On-demand monthly**: `$3.87` - estimated monthly cost (hourly × 730 hours)
* **Spot price**: `$0.00160/Hrs` - spot instance hourly cost for comparison
* **Spot monthly**: `$1.19` - estimated monthly spot cost
* **Change**: `+100%` - new resource, going from $0 to $3.87/month
**Key Feature**: MechCloud displays spot pricing alongside on-demand pricing for all EC2 instances. This encourages users to evaluate spot instances when suitable for their workloads, potentially saving up to 70-90% on compute costs.
**Creating a spot EC2 instance:**
```yaml
resources:
- type: aws_ec2_launch_template
name: template1
props:
launch_template_name: "template1"
launch_template_data:
instance_type: "t3.nano"
image_id: "ami-0bc691261a82b32bc"
instance_market_options:
market_type: "spot"
- type: aws_ec2_instance
name: spot_vm1
props:
launch_template:
launch_template_id: "ref:template1"
version: "1"
```
**Plan output:**
```
template1 (action: create)
spot_vm1 (action: create, spot-price: $0.00160/Hrs, spot-monthly: $1.19, change: +100%)
```
For spot instances, only spot pricing is shown since the instance will use spot capacity. The +100% change indicates a new resource.
#### DynamoDB Table (Mixed: Usage-Based + Consumption-Based)
DynamoDB provisioned capacity tables demonstrate both pricing types - calculated costs for provisioned capacity (usage-based) and pricing rates for storage (consumption-based).
**Creating a DynamoDB table (Standard class, provisioned capacity):**
```yaml
resources:
- name: provisioned_standard
type: aws_dynamodb_table
props:
table_name: "test-provisioned"
billing_mode: "PROVISIONED"
provisioned_throughput:
read_capacity_units: 30
write_capacity_units: 35
attribute_definitions:
- attribute_name: "id"
attribute_type: "S"
key_schema:
- attribute_name: "id"
key_type: "HASH"
```
**Plan output:**
```
provisioned_standard (action: create, change: +100%)
=> Price (Write capacity units)
=> Tier 1 (First 25 WCU - price: $0.00/WCU-Hrs, quantity: 25, monthly: $0.00, change: 0%)
=> Tier 2 (Beyond 25 WCU - price: $0.00065/WCU-Hrs, quantity: 10, monthly: $4.84, change: +100%)
=> Price (Read capacity units)
=> Tier 1 (First 25 RCU - price: $0.00/RCU-Hrs, quantity: 25, monthly: $0.00, change: 0%)
=> Tier 2 (Beyond 25 RCU - price: $0.00013/RCU-Hrs, quantity: 5, monthly: $0.48, change: +100%)
=> Price (Storage (standard))
=> Tier 1 (First 25 GB - price: $0.00/GB-Mo)
=> Tier 2 (Beyond 25 GB - price: $0.25/GB-Mo)
```
The plan shows:
* **Usage-based (calculated costs)**: Provisioned read/write capacity units with tiered pricing
* First 25 WCU/RCU are free
* Additional capacity shows `quantity` and calculated `monthly` cost
* Example: 10 WCU beyond free tier = `$4.84/month`
* **Consumption-based (pricing only)**: Storage shows pricing rates (`$0.25/GB-Mo`) without calculated costs since actual storage volume is unknown at provisioning time
**Creating a DynamoDB table (Infrequent Access class):**
```yaml
resources:
- name: provisioned_standard_ia
type: aws_dynamodb_table
props:
table_name: "test-provisioned"
billing_mode: "PROVISIONED"
table_class: "STANDARD_INFREQUENT_ACCESS"
provisioned_throughput:
read_capacity_units: 30
write_capacity_units: 35
attribute_definitions:
- attribute_name: "id"
attribute_type: "S"
key_schema:
- attribute_name: "id"
key_type: "HASH"
```
**Plan output:**
```
provisioned_standard_ia (action: create, change: +100%)
=> Price (Write capacity units (IA) - price: $0.00081/WCU-Hrs, quantity: 35, monthly: $21.09, change: +100%)
=> Price (Read capacity units (IA) - price: $0.00016/RCU-Hrs, quantity: 30, monthly: $3.57, change: +100%)
=> Price (Storage (IA) - price: $0.10/GB-Mo)
```
The Infrequent Access class shows:
* **Higher capacity costs**: No free tier, all capacity units are charged
* 35 WCU = `$21.09/month` (calculated)
* 30 RCU = `$3.57/month` (calculated)
* **Lower storage costs**: `$0.10/GB-Mo` vs `$0.25/GB-Mo` for Standard class (pricing only)
### Supported Resources
MechCloud provides real-time pricing for the following AWS resource types:
| Offering | Resource Type |
| ----------- | ------------------------------- |
| EC2 | Instance (Virtual Machine) |
| | Volume (EBS) |
| | Elastic IP |
| | NAT Gateway |
| | VPN Connection |
| | Transit Gateway |
| ECS | Service (Fargate) |
| EKS | Cluster |
| ElastiCache | Cache Cluster |
| | Replication Group |
| ELB | Load Balancer (ALB / NLB / GLB) |
| Lambda | Capacity Provider |
| Lightsail | Instance |
| MSK | Managed Kafka Cluster |
| RDS | DB Instance |
| | DB Cluster (Aurora) |
| DynamoDB | Table |
| S3 | Bucket |
| Route53 | Hosted Zone |
For detailed pricing examples, see [Examples (Resources With Cost)](/cloud-computing/stateless-iac/aws/examples-resources-with-cost).
### Regional Pricing
Costs vary by AWS region. MechCloud automatically applies region-specific pricing.
Example - `t3.medium` pricing:
```yaml
# us-east-1
instance_type: "t3.medium" # $0.0416/Hr, $30.37/month
# ap-south-1
instance_type: "t3.medium" # $0.0448/Hr, $32.70/month
```
### Using Pricing Data
#### Compare Configurations
```yaml
# Option A - Compute optimized
instance_type: "c6i.2xlarge" # $0.34/Hr, $248.20/month
# Option B - General purpose
instance_type: "m6i.2xlarge" # $0.384/Hr, $280.32/month
```
#### Track Environment Costs
When generating plans for different Resource Contexts:
```
Development environment (context: app-dev)
Monthly cost: $125.43
Production environment (context: app-prod)
Monthly cost: $892.15
```
#### Document Cost Decisions
```yaml
resources:
- type: aws_ec2_instance
name: api-server
props:
# c6i.xlarge for consistent CPU performance
# Cost: +$18.25/month vs t3.xlarge
# Justified by API latency requirements
instance_type: "c6i.xlarge"
```
### Example Workflow
This example demonstrates how real-time pricing helps optimize infrastructure costs during development.
#### Initial Configuration
```yaml
resources:
- type: aws_ec2_instance
name: web-server
props:
instance_type: "t3.large"
- type: aws_rds_db_instance
name: postgres-db
props:
instance_class: "db.t3.medium"
allocated_storage: 100
```
When you generate a plan, MechCloud shows costs for each resource. You can then adjust instance types and storage to optimize costs before deploying.
#### Cost Optimization
By reviewing the pricing information in the plan:
1. **Resize compute**: Change `t3.large` to `t3.medium` to reduce EC2 costs
2. **Adjust storage**: Reduce RDS storage from 100GB to 50GB if appropriate
3. **Consider spot**: Evaluate spot instances for non-critical workloads
Each configuration change generates a new plan showing updated costs, enabling iterative optimization before any resources are created.
### Best Practices
**Include cost justification in code comments** - Document why specific instance types or sizes were chosen.
**Compare costs during code review** - Review cost deltas alongside configuration changes.
**Track cost trends over time** - Save plan outputs to monitor infrastructure cost evolution.
**Use Resource Context for cost isolation** - Separate cost tracking by environment (dev, staging, prod).
**Monitor actual vs estimated costs** - Compare MechCloud estimates against actual cloud bills to refine understanding.
### Integration with Stateless IaC
Real-time pricing works seamlessly with MechCloud's stateless architecture:
**Fresh pricing every plan** - No stale data from state files
**Accurate cost deltas** - Costs compared against actual current state
**Environment isolation** - Resource Context enables per-environment cost tracking
### Next Steps
* [Examples (Resources With Cost)](/cloud-computing/stateless-iac/aws/examples-resources-with-cost)
* [Authoring Desired State](/cloud-computing/stateless-iac/aws/authoring-desired-state)
# Authoring desired state
This guide explains how to **author the desired state** in MechCloud Stateless IaC for AWS. You define your infrastructure using a clean, hierarchical YAML format that is inspired by CloudFormation but significantly simpler — no logical IDs, no `!Ref`, no state files, and no `PascalCase`. Instead, you use **nesting for relationships**, **`snake_case` for properties**, and **`ref:` syntax** for cross-resource references.
### Key Principles
| Principle | Description |
| ---------------------------- | --------------------------------------------------------------------------------------------------------------------- |
| **Hierarchy = Relationship** | Nest resources to define parent-child relationships (e.g., subnet inside VPC). |
| **Unique Relative Paths** | Every resource must have a unique path (e.g., `vpc1/subnet1/instance1`). You are responsible for ensuring uniqueness. |
| **`snake_case` Properties** | All keys use lowercase with underscores (e.g., `cidr_block`, not `CidrBlock`). |
| **No Parent IDs** | Do **not** include `vpc_id`, `subnet_id`, etc. — MechCloud infers them from nesting. |
| **Sibling References** | Use `ref:` **only** if both resources are in the **same `resources:` block**. |
| **Non-Sibling References** | Use `ref:` to reference resources outside the current parent. |
### Step-by-Step: From CloudFormation to MechCloud
Let’s convert a simple `CloudFormation` stack into a MechCloud desired state.
#### CloudFormation (Original)
```yaml
Resources:
VPC1:
Type: AWS::EC2::VPC
Properties:
CidrBlock: "10.2.0.0/16"
SGWeb:
Type: AWS::EC2::SecurityGroup
Properties:
VpcId: !Ref VPC1
GroupDescription: "Allow HTTP from internet"
SecurityGroupIngress:
- IpProtocol: tcp
FromPort: 80
ToPort: 80
CidrIp: "0.0.0.0/0"
SGService:
Type: AWS::EC2::SecurityGroup
Properties:
VpcId: !Ref VPC1
GroupDescription: "Allow app traffic only from web1 SG"
SecurityGroupIngress:
- IpProtocol: tcp
FromPort: 8080
ToPort: 8080
SourceSecurityGroupId: !Ref SGWeb
Subnet1:
Type: AWS::EC2::Subnet
Properties:
VpcId: !Ref VPC1
CidrBlock: "10.2.1.0/24"
Service1:
Type: AWS::EC2::Instance
Properties:
ImageId: "ami-0bc691261a82b32bc"
InstanceType: "t3.small"
SubnetId: !Ref Subnet1
SecurityGroupIds:
- !Ref SGService
Web1:
Type: AWS::EC2::Instance
Properties:
ImageId: "ami-0bc691261a82b32bc"
InstanceType: "t3.small"
SubnetId: !Ref Subnet1
SecurityGroupIds:
- !Ref SGWeb
```
#### MechCloud Desired State (Converted)
```yaml
resources:
- type: aws_ec2_vpc
name: vpc1
props:
cidr_block: "10.2.0.0/16"
resources:
- type: aws_ec2_security_group
name: sg_web
props:
group_description: "Allow HTTP from internet"
security_group_ingress:
- ip_protocol: tcp
from_port: 80
to_port: 80
cidr_ip: "0.0.0.0/0"
- type: aws_ec2_security_group
name: sg_service
props:
group_description: "Allow app traffic only from web1 SG"
security_group_ingress:
- ip_protocol: tcp
from_port: 8080
to_port: 8080
source_security_group_id: "ref:sg_web"
- type: aws_ec2_subnet
name: subnet1
props:
cidr_block: "10.2.1.0/24"
resources:
- type: aws_ec2_instance
name: web1
props:
image_id: "ami-0bc691261a82b32bc"
instance_type: "t3.micro"
security_group_ids:
- "ref:vpc1/sg_web"
- type: aws_ec2_instance
name: service1
props:
image_id: "ami-0bc691261a82b32bc"
instance_type: "t3.small"
security_group_ids:
- "ref:vpc1/sg_service"
```
This template contains two security groups (`sg_web` and `sg_service`) that are declared together under the same parent resource (`vpc1`). `sg_service` needs to *refer to the ID* of `sg_web` in its ingress rule (AWS expects an actual security-group ID like `sg-0123456789`). Because that ID is only known once the security group is created, MechCloud lets you refer to the other resource by name using the special `ref:` syntax.
The EC2 instances (`web1` and `service1`) are nested under `subnet1`, which is a different `resources:` block (a different parent) than the security groups. They therefore cannot use the short `ref:sg_name` form (which resolves only among siblings in the same `resources:` block). Instead they must use the **full relative path** to the security group so MechCloud can uniquely locate it across the hierarchy:
* `source_security_group_id: "ref:sg_web"` — used *inside* `sg_service` because `sg_web` and `sg_service` are siblings under `vpc1`; this references `sg_web`’s ID for the security-group ingress rule.
* `security_group_ids: ["ref:vpc1/sg_web"]` and `["ref:vpc1/sg_service"]` — used on the EC2 instances because the instances live under `vpc1/subnet1`. The full path (`vpc1/sg_web`) tells MechCloud exactly which security-group resource to resolve and then substitute its actual ID into the instance’s `SecurityGroupIds` property.
In short: `ref:` (short form) points to a sibling resource in the same `resources:` block; `ref:` (path form) is required when the target resource lives under a different parent. MechCloud resolves either form at plan/apply time to the underlying AWS ID that CloudFormation/AWS expects.
### Conversion Rules
> **Tip**: Use hyphens in names for readability (e.g., `my-vpc`), but avoid spaces or special characters.
| CloudFormation | → | MechCloud |
| --------------------------------------------------- | - | --------------------------------------------------------- |
| `Type: AWS::EC2::VPC` | → | `type: aws_ec2_vpc` |
| `CidrBlock` | → | `cidr_block` |
| `VpcId: !Ref MyVPC` | → | **Remove** — use nesting |
| Logical ID `MyVPC` | → | `name: my-vpc` |
| `SecurityGroupIds: [!Ref MySG]` | → | `security_group_ids: ["ref:my-sg"]` |
| `SecurityGroupIngress` `SourceSecurityGroupId` | → | `security_group_ingress` `source_security_group_id` |
| `SecurityGroupIngress` `SourceSecurityGroupOwnerId` | → | `security_group_ingress` `source_security_group_owner_id` |
Notes and clarifications for the example template
* `snake_case` is mandatory in MechCloud YAML. MechCloud translates these property names to the AWS/CloudFormation property names when making provider calls (for example `source_security_group_id` → `SourceSecurityGroupId`).
* There are two kinds of `ref:` forms used in the example:
* **Short name (sibling) form:** `ref:` — used when one resource needs the ID of another resource that is declared **together under the same parent**. In the example both `sg_web` and `sg_service` are siblings under `vpc1`, so `sg_service` uses:
```yaml
source_security_group_id: "ref:sg_web"
```
MechCloud resolves `ref:sg_web` at plan/apply time to the actual security-group ID (for AWS).
* **Full-path (non-sibling) form:** `ref:` — used when the referencing resource is in a different part of the hierarchy (different parent). In the example EC2 instances live under `vpc1/subnet1`, so they must reference the security groups by full relative path:
```yaml
security_group_ids:
- "ref:vpc1/sg_web"
- "ref:vpc1/sg_service"
```
The full path disambiguates the target resource for MechCloud so it can resolve it to the AWS GroupId.
* Use `source_security_group_owner_id` when referencing a security group that belongs to a different AWS account (this maps to CloudFormation `SourceSecurityGroupOwnerId`).
* Always ensure the `ref:` target resolves to a security-group **resource** (so MechCloud can substitute the runtime GroupId). If a `ref:` points to a non-existent path/name, plan will fail with an unresolved reference error.
### **Resource Paths (Must Be Unique)**
Each resource gets a **unique relative path** based on its nesting within the hierarchy.\
This path allows MechCloud to resolve references (`ref:`) precisely at plan and apply time.
| Resource | Path |
| ------------------------ | ----------------------- |
| VPC | `vpc1` |
| Security Group — Web | `vpc1/sg_web` |
| Security Group — Service | `vpc1/sg_service` |
| Subnet | `vpc1/subnet1` |
| Instance — Web | `vpc1/subnet1/web1` |
| Instance — Service | `vpc1/subnet1/service1` |
Each resource’s path must be unique across the entire desired state file.
### Resource Id Aliases
Passing AMI ids and other resource identifiers, generated by a cloud provider, in the desired state is a huge pain. So you will first go to console or use cli and find out unique id of a cloud resource before using a child or linked resource. To simply this we support resource id aliases where you attached a special tag `mc-alias` to the target resource with a value of your choice and then use the value in a special format along with a predefined prefix for resource type. For example, instead of specifying AMI Ids, which vary by region, you can simply tag an AMI (e.g ubuntu server 24.04 for arm64) with `arm64_ubuntu_24_04` alias in all the regions and then use this value in the desired state, which will be region agnostic, as follows -
```
resources:
- name: test-t4g-small
type: aws_ec2_instance
props:
instance_type: "t4g.small"
image_id: {{Image|arm64_ubuntu_24_04}}
```
resource id aliases are only supported for AWS AMIs at this moment and more resource types will be supported in the future -
| Provider | Resource Type | Prefix |
| -------- | -------------------------- | ------ |
| AWS | | |
| | Amazon Machine Image (AMI) | Image |
### Next Steps
1. **Select Execution Context**\
At the top of the MechCloud console, select the execution context for your operation:
* **Team** — e.g., `Academy (User 2)`
* **Cloud Provider** — e.g., `AWS`
* **Cloud Account** — e.g., `Academy`
* **Region** — e.g., `Europe (Ireland)`
* **Context** — e.g., `app1-dev1`
2. **Generate the Plan**\
Click **Plan** to generate an execution plan.\
MechCloud compares the desired state (defined in YAML) with the actual AWS infrastructure and determines which resources require changes.
3. **Review Plan Actions**\
Each resource in the plan shows an `action` indicating how MechCloud will reconcile it:
* `create` — the resource does not exist and will be created.
* `update` — the resource exists but properties differ and will be updated.
* `delete` — the resource exists but is no longer in the desired state and will be removed.
* `recreate` — the resource will be deleted and then created again (for non-updatable property changes).
* `none` — the resource is already in the desired state; no action required.
4. **Apply the Plan (When Changes Exist)**
* The **Apply** button becomes visible **only when** the plan includes at least one resource whose `action` is not `none`.
* Click **Apply** to provision or update resources as per the plan.
* MechCloud will execute the required operations and bring your AWS environment to match the desired state.
5. **Verify Post-Apply State**
* Once the apply completes, click **Plan** again to re-run the comparison.
* If all resources now display `action: none`, the desired and actual states are in sync.
* In this case, the **Apply** button will not be visible because no further changes are required.
6. **Handle Errors (If Any)**
* If any errors occur during the apply step, re-run **Plan** to refresh dependencies and reconcile state.
* Then click **Apply** again to retry provisioning with the updated plan.
# Demos
{% embed url="" %}
# Examples (Resources With Cost)
# EC2
# Instance (Virtual Machine)
### Creating a virtual machine with minimal parameters
{% hint style="warning" %}
You can generate similar template from MechCloud AWS agent using below prompts (one at a time) -\
\
create a security group named 'sg\_web' which allows traffic on port 443 form '223.223.223.100/32' port only. its description should be 'Allow HTTPS from private ip'.
\--------------------------------------------------------------------------------------------------------------------
create an ec2 instance named 'web1' with following details -\
image - ami-0bc691261a82b32bc\
instance type - t3.nano\
security groupd id - 'ref:sg\_web'
{% endhint %}
```
resources:
- name: sg_web
type: aws_ec2_security_group
props:
group_name: sg_web
group_description: "Allow HTTPS from private ip"
security_group_ingress:
- ip_protocol: tcp
from_port: 443
to_port: 443
cidr_ip: {{CURRENT_IP}}/32
- name: web1
type: aws_ec2_instance
props:
image_id: "{{ Image|arm64_ubuntu_24_04 }}"
instance_type: t4g.small
security_group_ids:
- "ref:sg_web"
```
#### Example price for above configuration
```
sg_web (action: create)
web1 (action: create, monthly: $4.51, change: +100%)
=> Price (Compute - price: $0.0052/Hrs, monthly: $3.87, spot-price: $0.0012/Hrs, spot-monthly: $0.89)
=> Volume 1 (/dev/sda1 - monthly: $0.64)
=> Price (Storage cost (gp3) - price: $0.08/GB-Mo, quantity: 8, monthly: $0.64)
=> Price (IOPS - monthly: $0.00)
=> Tier 1 (First 3000 IOPS-Mo - price: $0.00/IOPS-Mo, quantity: 3000, monthly: $0.00)
=> Price (Throughput - monthly: $0.00)
=> Tier 1 (First 125 MiBps-mo - price: $0.00/MiBps-mo, quantity: 125, monthly: $0.00)
```
### Creating a virtual machine with additional volumes
```
resources:
- name: sg_web
type: aws_ec2_security_group
props:
group_name: sg_web
group_description: "Allow HTTPS from private ip"
security_group_ingress:
- ip_protocol: tcp
from_port: 443
to_port: 443
cidr_ip: 223.223.223.100/32
- name: web1
type: aws_ec2_instance
props:
image_id: ami-0ecb62995f68bb549
instance_type: t3.nano
security_group_ids:
- "ref:sg_web"
block_device_mappings:
- device_name: /dev/xvda # Root volume
ebs:
volume_size: 30
volume_type: gp3
iops: 3100
throughput: 150
- device_name: /dev/xvdb # Additional volume 1
ebs:
volume_size: 100
volume_type: gp2
```
#### Example price for above configuration
```
sg_web (action: create)
web1 (action: create, monthly: $17.77, change: +100%)
=> Price (Compute - price: $0.0052/Hrs, monthly: $3.87, spot-price: $0.0012/Hrs, spot-monthly: $0.89)
=> Volume 1 (/dev/sda1 - monthly: $3.90)
=> Price (Storage cost (gp3) - price: $0.08/GB-Mo, quantity: 30, monthly: $2.40)
=> Price (IOPS - monthly: $0.50)
=> Tier 1 (First 3000 IOPS-Mo - price: $0.00/IOPS-Mo, quantity: 3000, monthly: $0.00)
=> Tier 2 (Over 3000 IOPS-Mo - price: $0.005/IOPS-Mo, quantity: 100, monthly: $0.50)
=> Price (Throughput - monthly: $1.00)
=> Tier 1 (First 125 MiBps-mo - price: $0.00/MiBps-mo, quantity: 125, monthly: $0.00)
=> Tier 2 (Over 125 MiBps-mo - price: $0.04/MiBps-mo, quantity: 25, monthly: $1.00)
=> Volume 2 (/dev/sdf - monthly: $10.00)
=> Price (Storage cost (gp2) - price: $0.10/GB-Mo, quantity: 100, monthly: $10.00)
```
### Creating a virtual machine with free trial (t4g.small)
{% hint style="info" %}
**Free Trial display:** The `t4g.small` instance type qualifies for AWS Free Trial (750 hours/month until Dec 2026). Free trial info is shown in the **plan header** (not as a pricing dimension) because it applies at the AWS account level, not per resource. This avoids confusion when multiple `t4g.small` instances exist in the desired state.
{% endhint %}
```
resources:
- name: sg_web
type: aws_ec2_security_group
props:
group_name: sg_web
group_description: "Allow HTTPS from private ip"
security_group_ingress:
- ip_protocol: tcp
from_port: 443
to_port: 443
cidr_ip: 223.223.223.100/32
- name: arm_vm1
type: aws_ec2_instance
props:
image_id: ami-0ecb62995f68bb549
instance_type: t4g.small
security_group_ids:
- "ref:sg_web"
```
#### Example plan output
```
sg_web (action: create)
arm_vm1 (action: create, monthly: $12.56, change: +100%, Free Trial (Dec 2026) (Account - free-hours: 750, monthly-discount: $12.26))
=> Price (Compute - price: $0.0168/Hrs, monthly: $12.26, spot-price: $0.0050/Hrs, spot-monthly: $3.72)
=> Volume 1 (/dev/sda1 - monthly: $0.64)
=> Price (Storage cost (gp3) - price: $0.08/GB-Mo, quantity: 8, monthly: $0.64)
=> Price (IOPS - monthly: $0.00)
=> Tier 1 (First 3000 IOPS-Mo - price: $0.00/IOPS-Mo, quantity: 3000, monthly: $0.00)
=> Price (Throughput - monthly: $0.00)
=> Tier 1 (First 125 MiBps-mo - price: $0.00/MiBps-mo, quantity: 125, monthly: $0.00)
```
### Creating a spot virtual machine
{% hint style="warning" %}
You can generate similar template from MechCloud AWS agent using below prompts (one at a time) -\
\
create a launch template named 'template1' with following details -
image - ami-0bc691261a82b32bc
instance type - t3.nano\
market type - spot
\--------------------------------------------------------------------------------------------------------------------
create an ec2 instance named 'spot\_vm1' using 'ref:template1' launch template id and version 1 of this template
{% endhint %}
```
resources:
- type: aws_ec2_launch_template
name: template1
props:
launch_template_name: "template1"
launch_template_data:
instance_type: "t3.nano"
image_id: "ami-0ecb62995f68bb549"
instance_market_options:
market_type: "spot"
- type: aws_ec2_instance
name: spot_vm1
props:
launch_template:
launch_template_id: "ref:template1"
version: "1"
```
#### Example price for above configuration
```
template1 (action: create)
spot_vm1 (action: create, monthly: $1.53, change: +100%)
=> Price (Compute - spot-price: $0.0012/Hrs, spot-monthly: $0.89)
=> Volume 1 (/dev/sda1 - monthly: $0.64)
=> Price (Storage cost (gp3) - price: $0.08/GB-Mo, quantity: 8, monthly: $0.64)
=> Price (IOPS - monthly: $0.00)
=> Tier 1 (First 3000 IOPS-Mo - price: $0.00/IOPS-Mo, quantity: 3000, monthly: $0.00)
=> Price (Throughput - monthly: $0.00)
=> Tier 1 (First 125 MiBps-mo - price: $0.00/MiBps-mo, quantity: 125, monthly: $0.00)
```
# Volume
### Creating a gp3 volume
```
resources:
# gp3 - Default (3,000 IOPS, 125 MB/s baseline included)
- name: gp3-default-volume
type: aws_ec2_volume
props:
availability_zone: "us-east-1a"
size: 100
volume_type: "gp3"
# iops: 3000 (default, included in storage price)
# throughput: 125 (default, included in storage price)
# gp3 - With additional IOPS and throughput
- name: gp3-enhanced-volume
type: aws_ec2_volume
props:
availability_zone: "us-east-1a"
size: 200
volume_type: "gp3"
iops: 5000 # 2,000 above baseline
throughput: 150 # 25 MB/s above baseline
```
#### Example price for above configuration
```
gp3-default-volume (action: create, monthly: $8.00, change: +100%)
=> Price (Storage cost (gp3) - price: $0.08/GB-Mo, quantity: 100, monthly: $8.00)
=> Price (IOPS - monthly: $0.00)
=> Tier 1 (First 3000 IOPS-Mo - price: $0.00/IOPS-Mo, quantity: 3000, monthly: $0.00)
=> Price (Throughput - monthly: $0.00)
=> Tier 1 (First 125 MiBps-mo - price: $0.00/MiBps-mo, quantity: 125, monthly: $0.00)
gp3-enhanced-volume (action: create, monthly: $27.00, change: +100%)
=> Price (Storage cost (gp3) - price: $0.08/GB-Mo, quantity: 200, monthly: $16.00)
=> Price (IOPS - monthly: $10.00)
=> Tier 1 (First 3000 IOPS-Mo - price: $0.00/IOPS-Mo, quantity: 3000, monthly: $0.00)
=> Tier 2 (Over 3000 IOPS-Mo - price: $0.005/IOPS-Mo, quantity: 2000, monthly: $10.00)
=> Price (Throughput - monthly: $1.00)
=> Tier 1 (First 125 MiBps-mo - price: $0.00/MiBps-mo, quantity: 125, monthly: $0.00)
=> Tier 2 (Over 125 MiBps-mo - price: $0.04/MiBps-mo, quantity: 25, monthly: $1.00)
```
### Creating a gp2 volume
```
resources:
# gp2 - Previous generation (IOPS included in storage price)
- name: gp2-volume
type: aws_ec2_volume
props:
availability_zone: "us-east-1a"
size: 100
volume_type: "gp2"
```
#### Example price for above configuration
```
gp2-volume (action: create, monthly: $10.00)
=> Price (Storage cost (gp2) - price: $0.10/GB-Mo, quantity: 100, monthly: $10.00)
```
### Creating an io2 volume
```
resources:
# io2 - Provisioned IOPS (10,000 IOPS - single tier)
- name: io2-volume-10k
type: aws_ec2_volume
props:
availability_zone: "us-east-1a"
size: 100
volume_type: "io2"
iops: 10000
# io2 - Provisioned IOPS (50,000 IOPS - tiered pricing)
- name: io2-volume-50k
type: aws_ec2_volume
props:
availability_zone: "us-east-1a"
size: 200
volume_type: "io2"
iops: 50000 # Spans multiple tiers: 32K + 18K
```
#### Example price for above configuration
```
io2-volume-10k (action: create, monthly: $662.50)
=> Price (Storage cost (io2) - price: $0.125/GB-Mo, quantity: 100, monthly: $12.50)
=> Price (IOPS - monthly: $650.00)
=> Tier 1 (First 32000 IOPS-Mo - price: $0.065/IOPS-Mo, quantity: 10000, monthly: $650.00)
io2-volume-50k (action: create, monthly: $2,899.00)
=> Price (Storage cost (io2) - price: $0.125/GB-Mo, quantity: 200, monthly: $25.00)
=> Price (IOPS - monthly: $2,874.00)
=> Tier 1 (First 32000 IOPS-Mo - price: $0.065/IOPS-Mo, quantity: 32000, monthly: $2,080.00)
=> Tier 2 (Next 32000 IOPS-Mo - price: $0.0455/IOPS-Mo, quantity: 18000, monthly: $819.00)
```
### Creating a io1 volume
```
resources:
# io1 - Provisioned IOPS (previous generation)
- name: io1-volume
type: aws_ec2_volume
props:
availability_zone: "us-east-1a"
size: 100
volume_type: "io1"
iops: 5000
```
#### Example price for above configuration
```
io1-volume (action: create, monthly: $337.50)
=> Price (Storage cost (io1) - price: $0.125/GB-Mo, quantity: 100, monthly: $12.50)
=> Price (IOPS - price: $0.065/IOPS-Mo, quantity: 5000, monthly: $325.00)
```
### Creating a st1 volume
```
resources:
# st1 - Throughput Optimized HDD
- name: st1-volume
type: aws_ec2_volume
props:
availability_zone: "us-east-1a"
size: 500 # Minimum 125 GB
volume_type: "st1"
```
#### Example price for above configuration
```
st1-volume (action: create, monthly: $22.50)
=> Price (Storage cost (st1) - price: $0.045/GB-Mo, quantity: 500, monthly: $22.50)
```
### Creating a sc1 volume
```
resources:
# sc1 - Cold HDD
- name: sc1-volume
type: aws_ec2_volume
props:
availability_zone: "us-east-1a"
size: 500 # Minimum 125 GB
volume_type: "sc1"
```
#### Example price for above configuration
```
sc1-volume (action: create, monthly: $7.50)
=> Price (Storage cost (sc1) - price: $0.015/GB-Mo, quantity: 500, monthly: $7.50)
```
# Elastic IP
### Creating an elastic ip with minimal inputs
```
resources:
- type: aws_ec2_eip
name: elastic-ip1
```
#### Example price for above configuration
```
elastic-ip1 (action: create, price: $0.00500/Hrs, monthly: $3.72)
```
# Nat Gateway
### Creating a zonal gateway with minimal parameters
```
resources:
- type: aws_ec2_nat_gateway
name: nat_gateway1 (zonal)
props:
subnet_id: "subnet-12345"
```
#### Example price for above configuration
```
nat_gateway1 (zonal) (action: create, price: $0.04500/Hrs, monthly: $33.48)
```
### Creating a regional gateway with minimal parameters
```
resources:
- type: aws_ec2_nat_gateway
name: nat_gateway2 (regional)
props:
availability_mode: regional
```
#### Example price for above configuration
```
nat_gateway2 (regional) (action: create, price: $0.04500/Hrs, monthly: $33.48)
```
# VPN Connection
### Creating a connection with minimal parameters
```
resources:
- type: aws_ec2_vpn_connection
name: vpn-connection1
props:
type: "ipsec.1"
customer_gateway_id: "cgw-1234567890abcdef0"
vpn_gateway_id: "vgw-1234567890abcdef0"
```
#### Example price for above configuration
```
vpn-connection1 (action: create, price: $0.05000/Hrs, monthly: $37.20)
```
# Transit Gateway
### Creating a gateway with minimal parameters
```
resources:
- type: aws_ec2_transit_gateway
name: transit-gateway1
props:
description: "Transit Gateway 1"
```
#### Example price for above configuration
```
transit-gateway1 (action: create, price: $0.05000/Hrs, monthly: $37.20)
```
# ECS
### Creating a task and associated service with minimal parameters
```
resources:
- type: aws_ecs_task_definition
name: my-task
props:
family: my-task-family
cpu: "1024"
memory: "2048"
network_mode: awsvpc
requires_compatibilities:
- FARGATE
container_definitions:
- name: my-container
image: nginx:latest
port_mappings:
- container_port: 80
protocol: tcp
- type: aws_ecs_service
name: my-service
props:
cluster: my-existing-cluster
task_definition: "ref:my-task"
desired_count: 1
launch_type: FARGATE
network_configuration:
awsvpc_configuration:
subnets:
- subnet-12345678
security_groups:
- sg-12345678
assign_public_ip: ENABLED
```
#### Example price for above configuration
```
my-task (action: create)
my-service (action: create)
=> Price (vCPU cost (1.0 vCPU, x86_64, Linux) - price: $0.04048/Hrs, monthly: $30.12)
=> Price (Memory cost (2.0 GB, x86_64, Linux) - price: $0.00445/Hrs, monthly: $3.31)
```
# EKS
# EKS Cluster
### Creating a standard cluster with minimal parameters
```
resources:
# EKS Cluster (non-auto mode)
- type: aws_eks_cluster
name: eks-cluster1
props:
version: "1.31"
role_arn: "arn:aws:iam::123456789012:role/eks-cluster-role"
resources_vpc_config:
subnet_ids:
- "subnet-0123456789abcdef0"
- "subnet-0123456789abcdef1"
endpoint_public_access: true
endpoint_private_access: true
security_group_ids:
- "sg-0123456789abcdef0"
resources:
# Managed Node Group - nested under the cluster
- type: aws_eks_nodegroup
name: eks-nodegroup1
props:
node_role: "arn:aws:iam::123456789012:role/eks-node-role"
subnets:
- "subnet-0123456789abcdef0"
- "subnet-0123456789abcdef1"
scaling_config:
min_size: 1
desired_size: 2
max_size: 3
instance_types:
- "t3.medium"
- "t3.large"
capacity_type: "ON_DEMAND"
```
#### Example price for above configuration
```
eks-cluster1 (action: create)
=> Price (Control plane standard support - price: $0.10/Hrs, monthly: $74.40)
-- eks-nodegroup1 (action: create, instance-size: t3.large, price: $0.0832/Hrs, monthly: $61.90, node-count: 3, monthly-nodes: $185.70)
```
### Creating an auto mode cluster with minimal parameters
```
resources:
# EKS Cluster (auto mode)
- type: aws_eks_cluster
name: eks-cluster2
props:
version: "1.31"
role_arn: "arn:aws:iam::123456789012:role/eks-cluster-role"
compute_config:
enabled: true
resources_vpc_config:
subnet_ids:
- "subnet-0123456789abcdef0"
- "subnet-0123456789abcdef1"
endpoint_public_access: true
endpoint_private_access: true
```
#### Example price for above configuration
```
eks-cluster2 (action: create)
=> Price (Control plane standard support - price: $0.10/Hrs, monthly: $74.40)
=> Price (Additional per node (t3.medium) - price: $0.00499/Hrs, monthly: $3.71)
```
# EKS Capabilities (Auto Mode)
### Creating an ack capability with minimal parameters
```
resources:
- type: aws_eks_capability
name: ack-capability
props:
cluster_name: "my-existing-cluster"
capability_name: "my-ack-capability"
type: "ACK"
role_arn: "arn:aws:iam::123456789012:role/EKSCapabilityRole"
delete_propagation_policy: "RETAIN"
```
#### Example price for above configuration
```
ack-capability (action: create)
=> Price (Capability - price: $0.005/Hrs, monthly: $3.72)
=> Price (Per resource - price: $0.00005/Hrs, monthly: $0.04)
```
### Creating an kro capability with minimal parameters
```
resources:
- type: aws_eks_capability
name: kro-capability
props:
cluster_name: "my-existing-cluster"
capability_name: "my-kro-capability"
type: "KRO"
role_arn: "arn:aws:iam::123456789012:role/EKSCapabilityRole"
delete_propagation_policy: "RETAIN"
```
#### Example price for above configuration
```
kro-capability (action: create)
=> Price (Capability - price: $0.005/Hrs, monthly: $3.72)
=> Price (Per resource - price: $0.00005/Hrs, monthly: $0.04)
```
### Creating an argocd capability with minimal parameters
```
resources:
- type: aws_eks_capability
name: argocd-capability
props:
cluster_name: "my-existing-cluster"
capability_name: "my-argocd-capability"
type: "ARGOCD"
role_arn: "arn:aws:iam::123456789012:role/EKSCapabilityRole"
delete_propagation_policy: "RETAIN"
configuration:
argo_cd:
aws_idc:
idc_instance_arn: "arn:aws:sso:::instance/ssoins-1234567890abcdef"
```
#### Example price for above configuration
```
argocd-capability (action: create)
=> Price (Capability - price: $0.03/Hrs, monthly: $22.32)
=> Price (Per resource - price: $0.0015/Hrs, monthly: $1.12)
```
# Elastic Cache
# Cache Cluster
### Creating a cache cluster with minimal parameters
```
resources:
- type: aws_elasticache_cache_cluster
name: my-valkey-cluster
props:
engine: valkey
cache_node_type: cache.t3.micro
num_cache_nodes: 2
```
#### Example price for above configuration
```
my-valkey-cluster (action: create, price: $0.0136/Hrs, quantity: 2, monthly: $20.24)
```
# Replication Group
### Creating a replication group with minimal parameters
```
resources:
- type: aws_elasticache_replication_group
name: my-redis-replication-group
props:
replication_group_description: "My Redis replication group"
engine: redis
cache_node_type: cache.t3.micro
num_cache_clusters: 2
```
#### Example price for above configuration
```
my-redis-replication-group (action: create, price: $0.017/Hrs, quantity: 2, monthly: $25.30)
```
# ELB
# Load Balancers (v2)
###
# Network Load Balancers
### Creating a load balancer with minimal parameters
```
resources:
- type: aws_elbv2_load_balancer
name: net-lb1
props:
type: "network"
subnets:
- "subnet-1234"
```
#### Example price for above configuration
```
net-lb1 (action: create, price: $0.02250/Hrs, monthly: $16.74)
```
# Application Load Balancers
### Creating a load balancer with minimal parameters
```
resources:
- type: aws_elbv2_load_balancer
name: app-lb1
props:
type: "application"
subnets:
- "subnet-1234"
```
#### Example price for above configuration
```
app-lb1 (action: create, price: $0.02250/Hrs, monthly: $16.74)
```
# Gateway Load Balancers
### Creating a load balancer with minimal parameters
```
resources:
- type: aws_elbv2_load_balancer
name: gateway-lb1
props:
type: "gateway"
subnets:
- "subnet-1234"
```
#### Example price for above configuration
```
gateway-lb1 (action: create, price: $0.01250/Hrs, monthly: $9.30)
```
# Lambda
# Lambda Managed Instances
### Docs
*
### Creating a lambda capacity provider with minimal parameters
```
resources:
- type: aws_lambda_capacity_provider
name: my-capacity-provider
props:
permissions_config:
capacity_provider_operator_role_arn: arn:aws:iam::123456789012:role/LambdaCapacityProviderRole
vpc_config:
subnet_ids:
- subnet-12345678
security_group_ids:
- sg-12345678
instance_requirements:
architectures:
- arm64
allowed_instance_types:
- m6g.large
- m6g.2xlarge
```
#### Example price for above configuration
```
my-capacity-provider (action: create)
=> Price (EC2 Instance cost (m6g.2xlarge) - price: $0.308/Hrs, monthly: $229.15)
=> Price (Management fee (m6g.2xlarge) - price: $0.0462/Hrs, monthly: $34.37)
```
# Lightsail
### Create a simple Lightsail instance
```
resources:
- type: aws_lightsail_instance
name: vm-1
props:
instance_name: vm-1
blueprint_id: ubuntu_24_04
bundle_id: nano_3_0
```
# RDS
# RDS Instance and Cluster
### Creating a single az instance with minimal parameters
```
resources:
- type: aws_rds_db_instance
name: mysql-db1
props:
db_instance_identifier: "my-mysql-db"
engine: "mysql"
engine_version: "8.0.35"
db_instance_class: "db.t3.micro"
allocated_storage: 100
storage_type: "gp2"
db_name: "mydb"
master_username: "admin"
master_user_password: "MyPassword123!"
db_subnet_group_name: "my-existing-subnet-group"
```
#### Example price for above configuration
```
mysql-db1 (action: create)
=> Price (Compute - price: $0.017/Hrs, monthly: $12.65)
=> Price (Storage - price: $0.115/GB-Mo, quantity: 200, monthly: $23.00)
```
### Creating a multi az instance with minimal parameters
```
resources:
- type: aws_rds_db_instance
name: mysql-db2
props:
db_instance_identifier: "my-mysql-db"
engine: "mysql"
engine_version: "8.0.35"
db_instance_class: "db.t3.micro"
allocated_storage: 200
storage_type: "gp3"
db_name: "mydb"
master_username: "admin"
master_user_password: "MyPassword123!"
db_subnet_group_name: "my-existing-subnet-group"
multi_az: true
```
#### Example price for above configuration
```
mysql-db2 (action: create)
=> Price (Compute - price: $0.034/Hrs, monthly: $25.30)
=> Price (Storage - price: $0.23/GB-Mo, quantity: 200, monthly: $46.00)
```
### Creating a multi az cluster with minimal parameters
```
resources:
- type: aws_rds_db_cluster
name: mysql-cluster
props:
db_cluster_identifier: "my-mysql-cluster"
engine: "mysql"
engine_version: "8.0.35"
db_cluster_instance_class: "db.m6gd.large"
allocated_storage: 200
storage_type: "gp3"
iops: 3000
database_name: "mydb"
master_username: "admin"
master_user_password: "MyPassword123!"
db_subnet_group_name: "my-existing-subnet-group"
```
#### Example price for above configuration
```
mysql-cluster (action: create)
=> Price (Price - price: $0.522/Hrs, monthly: $388.37)
=> Price (Storage - price: $0.345/GB-Mo, quantity: 200, monthly: $69.00)
```
# MSK
# Managed Kafka
### Creating a standard broker with minimal parameters
```
resources:
- type: aws_msk_cluster
name: test-msk-cluster
props:
cluster_name: "my-test-msk-cluster"
kafka_version: "3.6.0"
number_of_broker_nodes: 2
broker_node_group_info:
client_subnets:
- "subnet-0123456789abcdef0" # Replace with your actual subnet ID
- "subnet-0123456789abcdef1" # Replace with your actual subnet ID (must be in different AZ)
instance_type: "t3.small" # cf documentation wrongly mentions it with 'kafka' prefix
```
#### Example price for above configuration
```
test-msk-cluster (action: create, price: $0.0456/Hrs, quantity: 2, monthly: $67.85)
```
### Creating an express broker with minimal parameters
```
resources:
- type: aws_msk_cluster
name: test-msk-express-cluster
props:
cluster_name: "my-test-msk-express-cluster"
kafka_version: "3.6.0"
number_of_broker_nodes: 2
broker_node_group_info:
client_subnets:
- "subnet-0123456789abcdef0" # Replace with your actual subnet ID
- "subnet-0123456789abcdef1" # Replace with your actual subnet ID (must be in different AZ)
instance_type: "express.m7g.large" # Express broker type
storage_mode: "TIERED" # Required for Express brokers
```
#### Example price for above configuration
```
test-msk-express-cluster (action: create, price: $0.408/Hrs, quantity: 2, monthly: $607.10)
```
# Others
# Route53
### Creating a public hosted zone
```
resources:
- type: aws_route53_hosted_zone
name: example
props:
name: example.com
```
# Customer Gateway
### Creating a gateway with minimal parameters
```
resources:
- type: aws_ec2_customer_gateway
name: customer-gateway1
props:
type: "ipsec.1"
bgp_asn: 65000
ip_address: "203.0.113.1"
```
# DynamoDB
# On-Demand Capacity
### Creating a table (Standard) with minimal parameters
```
resources:
# On-Demand Table (Standard Class)
- name: test-ondemand-table
type: aws_dynamodb_table
props:
table_name: "test-ondemand-table"
billing_mode: "PAY_PER_REQUEST"
table_class: "STANDARD" # Standard storage class
attribute_definitions:
- attribute_name: "id"
attribute_type: "S"
key_schema:
- attribute_name: "id"
key_type: "HASH"
tags:
- key: "Environment"
value: "test"
```
#### Example price for above configuration
```
test-ondemand-table (action: create)
=> Price (Write request units - price: $0.625/Million-WRU)
=> Price (Read request units - price: $0.125/Million-RRU)
=> Price (Storage (standard))
=> Tier 1 (First 25 GB - price: $0.00/GB-Mo)
=> Tier 2 (Beyond 25 GB - price: $0.25/GB-Mo)
```
### Creating a table (Standard-IA) with minimal parameters
```
resources:
# On-Demand Table (Infrequent Access)
- name: test-ondemand-ia-table
type: aws_dynamodb_table
props:
table_name: "test-ondemand-ia-table"
billing_mode: "PAY_PER_REQUEST"
table_class: "STANDARD_INFREQUENT_ACCESS" # 50% cheaper storage, 25% more expensive requests
attribute_definitions:
- attribute_name: "id"
attribute_type: "S"
key_schema:
- attribute_name: "id"
key_type: "HASH"
```
#### Example price for above configuration
```
test-ondemand-ia-table (action: create)
=> Price (Write request units (IA) - price: $0.78/Million-WRU)
=> Price (Read request units (IA) - price: $0.155/Million-RRU)
=> Price (Storage (IA) - price: $0.10/GB-Mo)
```
# Provisioned Capacity
### Creating a table (Standard) with minimal parameters
```
resources:
- name: provisioned_standard
type: aws_dynamodb_table
props:
table_name: "test-provisioned"
billing_mode: "PROVISIONED"
provisioned_throughput:
read_capacity_units: 30
write_capacity_units: 35
attribute_definitions:
- attribute_name: "id"
attribute_type: "S"
key_schema:
- attribute_name: "id"
key_type: "HASH"
```
#### Example price for above configuration
```
provisioned_standard (action: create)
=> Price (Write capacity units)
=> Tier 1 (First 25 WCU - price: $0.00/WCU-Hrs, quantity: 25, monthly: $0.00)
=> Tier 2 (Beyond 25 WCU - price: $0.00065/WCU-Hrs, quantity: 10, monthly: $4.84)
=> Price (Read capacity units)
=> Tier 1 (First 25 RCU - price: $0.00/RCU-Hrs, quantity: 25, monthly: $0.00)
=> Tier 2 (Beyond 25 RCU - price: $0.00013/RCU-Hrs, quantity: 5, monthly: $0.48)
=> Price (Storage (standard))
=> Tier 1 (First 25 GB - price: $0.00/GB-Mo)
=> Tier 2 (Beyond 25 GB - price: $0.25/GB-Mo)
```
### Creating a table (Standard-IA) with minimal parameters
```
resources:
- name: provisioned_standard_ia
type: aws_dynamodb_table
props:
table_name: "test-provisioned"
billing_mode: "PROVISIONED"
table_class: "STANDARD_INFREQUENT_ACCESS"
provisioned_throughput:
read_capacity_units: 30
write_capacity_units: 35
attribute_definitions:
- attribute_name: "id"
attribute_type: "S"
key_schema:
- attribute_name: "id"
key_type: "HASH"
```
#### Example price for above configuration
```
provisioned_standard_ia (action: create)
=> Price (Write capacity units (IA) - price: $0.00081/WCU-Hrs, quantity: 35, monthly: $21.09)
=> Price (Read capacity units (IA) - price: $0.00016/RCU-Hrs, quantity: 30, monthly: $3.57)
=> Price (Storage (IA) - price: $0.10/GB-Mo)
```
# S3
# S3 Bucket
### Creating a bucket (Standard) with minimal parameters
```
resources:
# Standard Storage Class
- type: aws_s3_bucket
name: test-standard-bucket
props:
bucket_name: "test-standard-bucket"
```
#### Example price for above configuration
```
test-standard-bucket (action: create)
=> Price (Storage cost (Standard))
=> Tier 1 (First 50 TB - price: $0.023/GB-Mo)
=> Tier 2 (Next 450 TB - price: $0.022/GB-Mo)
=> Tier 3 (Over 500 TB - price: $0.021/GB-Mo)
=> Price (PUT/COPY/POST/LIST requests - price: $0.005/1K-Requests)
=> Price (GET and other requests - price: $0.004/10K-Requests)
```
### Creating a bucket (**Intelligent - Tiering**) with minimal parameters
```
resources:
- type: aws_s3_bucket
name: test-intelligent-tiering-bucket
props:
bucket_name: "test-intelligent-tiering-bucket"
intelligent_tiering_configurations:
- id: "EntireBucket"
status: "Enabled"
```
#### Example price for above configuration
```
test-intelligent-tiering-bucket (action: create)
=> Price (Storage cost (Frequent Access))
=> Tier 1 (First 50 TB - price: $0.023/GB-Mo)
=> Tier 2 (Next 450 TB - price: $0.022/GB-Mo)
=> Tier 3 (Over 500 TB - price: $0.021/GB-Mo)
=> Price (Storage cost (Infrequent Access) - price: $0.0125/GB-Mo)
=> Price (Storage cost (Archive Instant Access) - price: $0.004/GB-Mo)
=> Price (Storage cost (Archive Access) - price: $0.0036/GB-Mo)
=> Price (Storage cost (Deep Archive Access) - price: $0.00099/GB-Mo)
=> Price (PUT/COPY/POST/LIST requests - price: $0.005/1K-Requests)
=> Price (GET and other requests - price: $0.004/10K-Requests)
```
### Creating a bucket (**Standard - IA**) with minimal parameters
```
resources:
- type: aws_s3_bucket
name: test-standard-ia-bucket
props:
bucket_name: "test-standard-ia-bucket"
lifecycle_configuration:
rules:
- id: "transition-to-ia"
status: "Enabled"
transitions:
- days: 30
storage_class: "STANDARD_IA"
```
#### Example price for above configuration
```
test-standard-ia-bucket (action: create)
=> Price (Storage cost (Standard))
=> Tier 1 (First 50 TB - price: $0.023/GB-Mo)
=> Tier 2 (Next 450 TB - price: $0.022/GB-Mo)
=> Tier 3 (Over 500 TB - price: $0.021/GB-Mo)
=> Price (PUT/COPY/POST/LIST requests - price: $0.005/1K-Requests)
=> Price (GET and other requests - price: $0.004/10K-Requests)
=> Price (Storage cost (Standard-IA) - price: $0.0125/GB-Mo)
=> Price (PUT/COPY/POST/LIST requests (Standard-IA) - price: $0.01/1K-Requests)
=> Price (GET and other requests (Standard-IA) - price: $0.001/1K-Requests)
```
# S3 Tables
# Examples (Free Resources )
# Vpc
### Creating a vpc with minimal parameters
```
resources:
- type: aws_ec2_vpc
name: vpc1
props:
cidr_block: "10.2.0.0/16"
```
# Subnet
### Creating a subnet with minimal parameters
```
resources:
- type: aws_ec2_subnet
name: subnet1
props:
vpc_id: vpc-12345
cidr_block: "10.2.1.0/24"
```
# Security Group
### Creating a security group with minimal parameters
```
resources:
- type: aws_ec2_security_group
name: sg1
props:
vpc_id: vpc-12345
group_description: "Allow HTTP from internet"
security_group_ingress:
- ip_protocol: tcp
from_port: 80
to_port: 80
cidr_ip: "0.0.0.0/0"
```
# VPN Gateway
### Creating a gateway with minimal parameters
```
resources:
- type: aws_ec2_vpn_gateway
name: vpn-gateway1
props:
type: "ipsec.1"
```
# Azure
MechCloud's Stateless Infrastructure as Code (IaC) for Azure enables you to declaratively manage your Azure resources without relying on state files, eliminating common issues like state drift. By defining your desired infrastructure in YAML and comparing it directly against your live Azure environment, you can provision, update, and delete resources with confidence. This feature supports a wide range of Azure resources (e.g., Virtual Networks, Subnets, Network Security Groups, Virtual Machines) and integrates real-time pricing to provide proactive cost insights during planning.
For details on resource contexts (equivalent to Kubernetes namespaces for scoping resources), see the Resource Contexts documentation.
### Key Concepts
#### Desired State
The desired state is your YAML blueprint describing the infrastructure you want. It's hierarchical, using nesting to define parent-child relationships (e.g., a subnet inside a virtual network).
**Requirements**:
* Each resource must have a **unique relative path** based on its hierarchy (e.g., vnet1/subnet1/vm1), similar to a Linux file path. This is your responsibility to ensure uniqueness and prevent conflicts.
* Use `snake_case` for all properties (e.g., address\_prefix instead of addressPrefix).
* No explicit parent references (e.g., no virtual\_network\_id for a subnet—MechCloud infers from hierarchy).
* References:
* **Sibling references** (same parent): ref:\ (e.g., ref:nsg1).
* **Non-sibling references** (cross-hierarchy): ref:\ (e.g., ref:vnet1/nsg1).
#### Actual State
The actual state is a real-time snapshot of your Azure resources in the selected context, formatted to match the desired state structure (hierarchical, snake\_case properties). It includes resource types, names, identifiers, and properties.
#### Plan
The plan compares desired and actual states, proposing actions:
* **Create**: New resources.
* **Update**: In-place changes.
* **Recreate**: When at least one immutable property differs (requires delete + create).
* **Delete**: Remove extra resources.
* **None**: No changes needed.
Plans show hierarchy with indentation (-- for children) and include real-time pricing for compute/storage resources (hourly/monthly costs, % change).
# Real-time Pricing
MechCloud displays cost information directly in the plan output before any infrastructure changes are applied. This enables cost-aware infrastructure decisions during development rather than discovering costs after deployment.
### Overview
When generating an execution plan, MechCloud calculates and displays comprehensive cost information for Azure resources that have associated costs.
### Supported Billing Models
| Model | How it appears in the plan | Examples |
| -------------------- | --------------------------------------------- | ------------------------------------------------------- |
| Usage-based (hourly) | Hourly rate + max monthly total (730 hours) | Virtual Machines, Load Balancers, Public IPs |
| Storage (GB-month) | Monthly rate + total when size is known | Managed Disks (Premium SSD, Standard SSD, Standard HDD) |
| Consumption-based | Rate only (actual usage unknown at plan time) | Data transfer, Storage transactions, Bandwidth |
#### Usage-Based Charges (Price + Cost)
For resources with **predictable usage patterns**, MechCloud shows both price rates and calculated costs:
* Virtual Machine compute hours
* Public IP address hours
* Load Balancer hours
* Managed Disk storage (GB-Mo)
Example: A `Standard_B1s` VM shows `price: $0.01040/Hrs, monthly: $7.59`
**Azure Spot Pricing**: For all regular Virtual Machines, MechCloud displays both regular and spot pricing in the plan output. This helps users evaluate potential cost savings by using spot instances when suitable for their workloads.
Example: `vm1 (action: create, price: $0.01040/Hrs, monthly: $7.59, spot-price: $0.00312/Hrs, spot-monthly: $2.28)`
#### Consumption-Based Charges (Price Only)
For resources with **variable consumption**, MechCloud shows pricing rates but cannot calculate costs without actual usage data:
* Data transfer (GB)
* Storage transactions
* Bandwidth usage
* Application Gateway data processing
**Example**: Storage account transaction pricing shown as `Price (Transactions - price: $0.0004/10K transactions)`
### Cost Change Tracking
MechCloud displays cost change percentages for all resource actions, helping you understand the financial impact of infrastructure changes.
#### Create Actions
When creating new resources, the cost change is **+100%** (from $0 to the new cost):
```
vm1 (action: create, price: $0.01040/Hrs, monthly: $7.59, change: +100%)
```
#### Update Actions
When modifying existing resources, the change percentage reflects the actual cost difference.
**Example: Resizing a VM from Standard\_B2s to Standard\_B1s**
```
vm1 (action: update, price: $0.01040/Hrs, monthly: $7.59, change: -50%)
```
The -50% change indicates a 50% cost reduction from the previous `Standard_B2s` configuration.
**Example: Upgrading disk from Standard HDD to Premium SSD**
```
data_disk (action: update, monthly: $19.71, change: +150%)
```
The +150% change shows the cost increase from Standard HDD to Premium SSD tier.
#### Delete Actions
When deleting resources, the cost change is **-100%** (from current cost to $0):
```
vm1 (action: delete, price: $0.00/Hrs, monthly: $0.00, change: -100%)
```
### Plan Output Examples
#### Virtual Machine (Usage-Based Charges)
Virtual Machines have predictable usage patterns, so MechCloud calculates and displays actual hourly and monthly costs.
**Creating a regular Virtual Machine:**
```yaml
resources:
- type: Microsoft.Compute/virtualMachines
name: vm1
props:
location: "eastus"
hardware_profile:
vm_size: "Standard_B1s"
storage_profile:
image_reference:
publisher: "Canonical"
offer: "0001-com-ubuntu-server-jammy"
sku: "22_04-lts-gen2"
version: "latest"
os_disk:
create_option: "FromImage"
managed_disk:
storage_account_type: "Standard_LRS"
disk_size_gb: 30
os_profile:
computer_name: "vm1"
admin_username: "ubuntu"
linux_configuration:
disable_password_authentication: true
ssh:
public_keys:
- path: "/home/ubuntu/.ssh/authorized_keys"
key_data: "ssh-rsa AAAA..."
network_profile:
network_interfaces:
- id: "ref:nic1"
```
**Plan output:**
```
vm1 (action: create, price: $0.01040/Hrs, monthly: $7.59, spot-price: $0.00312/Hrs, spot-monthly: $2.28, change: +100%)
=> Compute (price: $0.01040/Hrs, monthly: $7.59, spot-price: $0.00312/Hrs, spot-monthly: $2.28)
=> Storage (OS Disk - Standard HDD S4 32GB - monthly: $1.54)
```
The plan shows:
* **Regular price**: `$0.01040/Hrs` - calculated hourly cost for Standard\_B1s VM
* **Regular monthly**: `$7.59` - estimated monthly cost (hourly × 730 hours)
* **Spot price**: `$0.00312/Hrs` - spot instance hourly cost for comparison
* **Spot monthly**: `$2.28` - estimated monthly spot cost
* **OS Disk**: `$1.54/month` - Standard HDD S4 tier (32GB)
* **Change**: `+100%` - new resource, going from $0 to $7.59/month
**Key Feature**: MechCloud displays spot pricing alongside regular pricing for all Virtual Machines. This encourages users to evaluate spot instances when suitable for their workloads, potentially saving up to 70-90% on compute costs.
**Creating a spot Virtual Machine:**
```yaml
resources:
- type: Microsoft.Compute/virtualMachines
name: spot_vm1
props:
location: "eastus"
priority: "Spot"
eviction_policy: "Deallocate"
billing_profile:
max_price: -1 # Pay up to regular price
hardware_profile:
vm_size: "Standard_B1s"
storage_profile:
image_reference:
publisher: "Canonical"
offer: "0001-com-ubuntu-server-jammy"
sku: "22_04-lts-gen2"
version: "latest"
os_disk:
create_option: "FromImage"
managed_disk:
storage_account_type: "Standard_LRS"
disk_size_gb: 30
os_profile:
computer_name: "spotvm1"
admin_username: "ubuntu"
linux_configuration:
disable_password_authentication: true
ssh:
public_keys:
- path: "/home/ubuntu/.ssh/authorized_keys"
key_data: "ssh-rsa AAAA..."
network_profile:
network_interfaces:
- id: "ref:nic1"
```
**Plan output:**
```
spot_vm1 (action: create, spot-price: $0.00312/Hrs, spot-monthly: $2.28, change: +100%)
=> Compute (spot-price: $0.00312/Hrs, spot-monthly: $2.28)
=> Storage (OS Disk - Standard HDD S4 32GB - monthly: $1.54)
```
For spot instances, only spot pricing is shown since the VM will use spot capacity. The +100% change indicates a new resource.
#### Managed Disk (Storage-Based Charges)
Managed Disks demonstrate storage-based pricing where costs are calculated based on the provisioned tier size.
**Creating a Premium SSD Managed Disk:**
```yaml
resources:
- type: Microsoft.Compute/disks
name: data_disk
props:
location: "eastus"
sku:
name: "Premium_LRS"
disk_size_gb: 128
creation_data:
create_option: "Empty"
```
**Plan output:**
```
data_disk (action: create, monthly: $19.71, change: +100%)
=> Storage (Premium SSD P10 128GB - monthly: $19.71)
```
The plan shows:
* **Monthly cost**: `$19.71` - Premium SSD P10 tier (128GB capacity)
* **Tier**: P10 - Azure automatically maps 128GB to P10 tier
* **Change**: `+100%` - new resource
**Azure Disk Tier Mapping**: Azure Managed Disks use fixed-size tiers. When you specify `disk_size_gb: 128`, Azure provisions a P10 disk (128GB capacity) and charges the P10 tier rate, not a per-GB rate.
**Creating a Standard SSD Managed Disk:**
```yaml
resources:
- type: Microsoft.Compute/disks
name: standard_disk
props:
location: "eastus"
sku:
name: "StandardSSD_LRS"
disk_size_gb: 256
creation_data:
create_option: "Empty"
```
**Plan output:**
```
standard_disk (action: create, monthly: $19.20, change: +100%)
=> Storage (Standard SSD E15 256GB - monthly: $19.20)
```
The Standard SSD E15 tier (256GB) costs `$19.20/month`, significantly less than Premium SSD for workloads that don't require premium performance.
#### Public IP Address (Usage-Based Charges)
Public IP addresses have hourly charges based on SKU type.
**Creating a Basic Public IP:**
```yaml
resources:
- type: Microsoft.Network/publicIPAddresses
name: public_ip1
props:
location: "eastus"
sku:
name: "Basic"
public_ip_allocation_method: "Dynamic"
```
**Plan output:**
```
public_ip1 (action: create, price: $0.00400/Hrs, monthly: $2.92, change: +100%)
```
**Creating a Standard Public IP:**
```yaml
resources:
- type: Microsoft.Network/publicIPAddresses
name: public_ip2
props:
location: "eastus"
sku:
name: "Standard"
public_ip_allocation_method: "Static"
```
**Plan output:**
```
public_ip2 (action: create, price: $0.00500/Hrs, monthly: $3.65, change: +100%)
```
Standard SKU costs more but provides additional features like zone redundancy and static allocation.
#### Load Balancer (Usage-Based Charges)
Load Balancers have hourly charges based on SKU type.
**Creating a Basic Load Balancer:**
```yaml
resources:
- type: Microsoft.Network/loadBalancers
name: lb1
props:
location: "eastus"
sku:
name: "Basic"
frontend_ip_configurations:
- name: "frontend1"
public_ip_address:
id: "ref:public_ip1"
```
**Plan output:**
```
lb1 (action: create, price: $0.02500/Hrs, monthly: $18.25, change: +100%)
```
**Creating a Standard Load Balancer:**
```yaml
resources:
- type: Microsoft.Network/loadBalancers
name: lb2
props:
location: "eastus"
sku:
name: "Standard"
frontend_ip_configurations:
- name: "frontend1"
public_ip_address:
id: "ref:public_ip2"
```
**Plan output:**
```
lb2 (action: create, price: $0.02500/Hrs, monthly: $18.25, change: +100%)
```
### Supported Resources
MechCloud provides real-time pricing for the following Azure resource types:
| Offering | Resource Type |
| --------------------------- | ----------------------- |
| Microsoft.Compute | Virtual Machine |
| | Managed Disk |
| Microsoft.ContainerService | AKS Managed Cluster |
| Microsoft.ContainerInstance | Container Instance |
| Microsoft.Network | Public IP Address |
| | Load Balancer |
| | Application Gateway |
| | NAT Gateway |
| | VPN Gateway |
| | Azure Firewall |
| | Front Door |
| | DNS Zone |
| Microsoft.Sql | SQL Database |
| Microsoft.DBforMySQL | Flexible Server |
| Microsoft.DBforPostgreSQL | Flexible Server |
| Microsoft.DocumentDB | Cosmos DB Account |
| Microsoft.Cache | Azure Cache for Redis |
| Microsoft.Storage | Storage Account |
| Microsoft.ServiceBus | Service Bus Namespace |
| Microsoft.EventHub | Event Hub Namespace |
| Microsoft.Web | App Service Plan |
| | Functions (Consumption) |
For detailed pricing examples, see [Examples (Resources With Cost)](/cloud-computing/stateless-iac/azure/examples-resources-with-cost).
### Regional Pricing
Costs vary by Azure region. MechCloud automatically applies region-specific pricing.
Example - `Standard_B1s` pricing:
```yaml
# eastus
vm_size: "Standard_B1s" # $0.01040/Hr, $7.59/month
# westeurope
vm_size: "Standard_B1s" # $0.01144/Hr, $8.35/month
```
### Using Pricing Data
#### Compare Configurations
```yaml
# Option A - Burstable series
vm_size: "Standard_B2s" # $0.0416/Hr, $30.37/month
# Option B - General purpose
vm_size: "Standard_D2s_v3" # $0.096/Hr, $70.08/month
```
#### Compare Disk Types
```yaml
# Option A - Standard HDD (S10 tier)
sku:
name: "Standard_LRS"
disk_size_gb: 128 # $5.89/month
# Option B - Premium SSD (P10 tier)
sku:
name: "Premium_LRS"
disk_size_gb: 128 # $19.71/month
```
#### Track Environment Costs
When generating plans for different Resource Contexts:
```
Development environment (context: app-dev)
Monthly cost: $125.43
Production environment (context: app-prod)
Monthly cost: $892.15
```
#### Document Cost Decisions
```yaml
resources:
- type: Microsoft.Compute/virtualMachines
name: api-server
props:
# Standard_D2s_v3 for consistent CPU performance
# Cost: +$39.71/month vs Standard_B2s
# Justified by API latency requirements
hardware_profile:
vm_size: "Standard_D2s_v3"
```
### Example Workflow
This example demonstrates how real-time pricing helps optimize infrastructure costs during development.
#### Initial Configuration
```yaml
resources:
- type: Microsoft.Compute/virtualMachines
name: web-server
props:
hardware_profile:
vm_size: "Standard_D2s_v3"
storage_profile:
os_disk:
managed_disk:
storage_account_type: "Premium_LRS"
disk_size_gb: 128
```
When you generate a plan, MechCloud shows costs for each resource. You can then adjust VM sizes and disk types to optimize costs before deploying.
#### Cost Optimization
By reviewing the pricing information in the plan:
1. **Resize compute**: Change `Standard_D2s_v3` to `Standard_B2s` to reduce VM costs
2. **Adjust disk type**: Change from Premium SSD to Standard SSD if performance allows
3. **Consider spot**: Evaluate spot instances for non-critical workloads
Each configuration change generates a new plan showing updated costs, enabling iterative optimization before any resources are created.
### Best Practices
**Include cost justification in code comments** - Document why specific VM sizes or disk types were chosen.
**Compare costs during code review** - Review cost deltas alongside configuration changes.
**Track cost trends over time** - Save plan outputs to monitor infrastructure cost evolution.
**Use Resource Context for cost isolation** - Separate cost tracking by environment (dev, staging, prod).
**Monitor actual vs estimated costs** - Compare MechCloud estimates against actual Azure bills to refine understanding.
**Understand disk tier pricing** - Azure charges by tier (P10, E15, S20), not exact GB size.
**Evaluate spot instances** - Review spot pricing for workloads that can tolerate interruptions.
### Azure-Specific Considerations
#### Disk Tier Pricing
Unlike per-GB pricing, Azure Managed Disks use fixed-size tiers:
**Premium SSD Tiers**:
* P4 (32GB) - $6.40/month
* P6 (64GB) - $12.29/month
* P10 (128GB) - $19.71/month
* P15 (256GB) - $38.40/month
* P20 (512GB) - $75.78/month
**Standard SSD Tiers**:
* E4 (32GB) - $2.40/month
* E6 (64GB) - $4.80/month
* E10 (128GB) - $9.60/month
* E15 (256GB) - $19.20/month
* E20 (512GB) - $38.40/month
**Standard HDD Tiers**:
* S4 (32GB) - $1.54/month
* S6 (64GB) - $3.01/month
* S10 (128GB) - $5.89/month
* S15 (256GB) - $11.52/month
* S20 (512GB) - $22.53/month
When you specify `disk_size_gb: 100`, Azure provisions the next tier up (e.g., P10 for 128GB) and charges the tier rate.
#### VM Spot Pricing
Azure Spot VMs can save up to 90% compared to regular pricing, but can be evicted when Azure needs capacity. Best for:
* Batch processing jobs
* Development/test environments
* Stateless workloads
* Interruptible computations
#### Regional Price Variations
Azure pricing varies significantly by region. Examples for `Standard_B1s`:
* East US: $0.01040/Hr
* West Europe: $0.01144/Hr
* Southeast Asia: $0.01248/Hr
Always check pricing for your target region during planning.
### Integration with Stateless IaC
Real-time pricing works seamlessly with MechCloud's stateless architecture:
**Fresh pricing every plan** - No stale data from state files
**Accurate cost deltas** - Costs compared against actual current state
**Environment isolation** - Resource Context enables per-environment cost tracking
### Next Steps
* [Examples (Resources With Cost)](/cloud-computing/stateless-iac/azure/examples-resources-with-cost)
* [Authoring Desired State](/cloud-computing/stateless-iac/azure/authoring-desired-state)
# Authoring desired state
This guide explains how to **author the desired state** in MechCloud Stateless IaC for Azure. You define your infrastructure using a clean, flat YAML format that is inspired by ARM templates but significantly simpler — no complex nested JSON, no `resourceId()` functions, no deployment state files, and no `camelCase`. Instead, you use **`snake_case` for properties**, **`ref:` syntax** for cross-resource references, and **`defaults:`** to avoid repetition.
### Key Principles
| Principle | Description |
| --------------------------- | ------------------------------------------------------------------------------------------------------------------------------------------ |
| **Flat Resource List** | All resources are declared in a single flat `resources:` list. Parent-child relationships are expressed via `ref:` syntax. |
| **`snake_case` Properties** | All keys use lowercase with underscores (e.g., `address_prefixes`, not `addressPrefixes`). |
| **Defaults Block** | Use `defaults:` to specify common values (like `resource_group`) once, avoiding repetition across all resources. |
| **`ref:` for IDs** | Use `ref:` to reference another resource's ID. MechCloud resolves this to the full Azure resource ID at plan/apply time. |
| **Nested Path References** | Use `ref://` to reference nested resources (e.g., `ref:vnet1/subnets/subnet1` for a subnet inside a VNet). |
| **API Version Required** | Each resource must specify its `api_version` to ensure compatibility with Azure Resource Manager. |
### Step-by-Step: From ARM Template to MechCloud
Let's convert a typical ARM template that creates a VM with networking into a MechCloud desired state.
#### ARM Template (Original)
```json
{
"$schema": "https://schema.management.azure.com/schemas/2019-04-01/deploymentTemplate.json#",
"contentVersion": "1.0.0.0",
"resources": [
{
"type": "Microsoft.Network/virtualNetworks",
"apiVersion": "2025-05-01",
"name": "vnet1",
"location": "[resourceGroup().location]",
"properties": {
"addressSpace": {
"addressPrefixes": ["10.0.0.0/16"]
},
"subnets": [
{
"name": "subnet1",
"properties": {
"addressPrefixes": ["10.0.1.0/24"]
}
}
]
}
},
{
"type": "Microsoft.Network/networkSecurityGroups",
"apiVersion": "2025-05-01",
"name": "nsg1",
"location": "[resourceGroup().location]",
"properties": {
"securityRules": [
{
"name": "allow-ssh",
"properties": {
"priority": 100,
"direction": "Inbound",
"access": "Allow",
"protocol": "Tcp",
"sourcePortRange": "*",
"destinationPortRange": "22",
"sourceAddressPrefix": "YOUR_IP/32",
"destinationAddressPrefix": "*"
}
}
]
}
},
{
"type": "Microsoft.Network/networkInterfaces",
"apiVersion": "2025-05-01",
"name": "nic1",
"location": "[resourceGroup().location]",
"dependsOn": [
"[resourceId('Microsoft.Network/virtualNetworks', 'vnet1')]",
"[resourceId('Microsoft.Network/networkSecurityGroups', 'nsg1')]"
],
"properties": {
"networkSecurityGroup": {
"id": "[resourceId('Microsoft.Network/networkSecurityGroups', 'nsg1')]"
},
"ipConfigurations": [
{
"name": "ipconfig1",
"properties": {
"subnet": {
"id": "[resourceId('Microsoft.Network/virtualNetworks/subnets', 'vnet1', 'subnet1')]"
},
"privateIPAllocationMethod": "Dynamic"
}
}
]
}
},
{
"type": "Microsoft.Compute/virtualMachines",
"apiVersion": "2025-04-01",
"name": "vm1",
"location": "[resourceGroup().location]",
"dependsOn": [
"[resourceId('Microsoft.Network/networkInterfaces', 'nic1')]"
],
"properties": {
"hardwareProfile": {
"vmSize": "Standard_B2pts_v2"
},
"osProfile": {
"computerName": "testvm",
"adminUsername": "ubuntu",
"adminPassword": "SecureP@ss2024!"
},
"networkProfile": {
"networkInterfaces": [
{
"id": "[resourceId('Microsoft.Network/networkInterfaces', 'nic1')]"
}
]
},
"storageProfile": {
"imageReference": {
"publisher": "Canonical",
"offer": "ubuntu-24_04-lts",
"sku": "server-arm64",
"version": "latest"
},
"osDisk": {
"createOption": "FromImage",
"managedDisk": {
"storageAccountType": "StandardSSD_LRS"
}
}
}
}
}
]
}
```
#### MechCloud Desired State (Converted)
```yaml
defaults:
resource_group: rg1
resources:
- type: "Microsoft.Network/virtualNetworks"
api_version: "2025-05-01"
name: vnet1
props:
address_space:
address_prefixes:
- "10.0.0.0/16"
subnets:
- name: subnet1
props:
address_prefixes:
- "10.0.1.0/24"
- type: "Microsoft.Network/networkSecurityGroups"
api_version: "2025-05-01"
name: nsg1
props:
security_rules:
- name: allow-ssh
props:
priority: 100
direction: Inbound
access: Allow
protocol: Tcp
source_port_range: "*"
destination_port_range: "22"
source_address_prefix: "{{CURRENT_IP}}/32"
destination_address_prefix: "*"
- type: "Microsoft.Network/networkInterfaces"
api_version: "2025-05-01"
name: nic1
props:
network_security_group:
id: "ref:nsg1"
ip_configurations:
- name: ipconfig1
props:
subnet:
id: "ref:vnet1/subnets/subnet1"
private_ip_allocation_method: Dynamic
- type: "Microsoft.Compute/virtualMachines"
api_version: "2025-04-01"
name: vm1
props:
hardware_profile:
vm_size: Standard_B2pts_v2
os_profile:
computer_name: testvm
admin_username: ubuntu
admin_password: SecureP@ss2024!
network_profile:
network_interfaces:
- id: "ref:nic1"
storage_profile:
image_reference:
publisher: Canonical
offer: ubuntu-24_04-lts
sku: server-arm64
version: latest
os_disk:
create_option: FromImage
managed_disk:
storage_account_type: StandardSSD_LRS
```
### Key Simplifications
#### 1. The `defaults:` Block — Eliminate Repetition
In ARM templates, you must specify `location` and often reference the resource group repeatedly using functions like `[resourceGroup().location]`. In MechCloud, the `defaults:` block lets you define common values once:
```yaml
defaults:
resource_group: rg1
```
This value is automatically applied to all resources in the template. You don't need to repeat `resource_group: rg1` for each resource.
**Benefits:**
* **Less repetition** — Define once, apply everywhere
* **Fewer errors** — No risk of typos or inconsistent values
* **Cleaner templates** — Focus on what makes each resource unique
#### 2. The `ref:` Syntax — Simple Resource References
ARM templates require verbose `resourceId()` function calls to reference other resources:
```json
"id": "[resourceId('Microsoft.Network/networkSecurityGroups', 'nsg1')]"
```
In MechCloud, you simply use:
```yaml
id: "ref:nsg1"
```
MechCloud automatically resolves `ref:nsg1` to the full Azure resource ID at plan/apply time:
```
/subscriptions/{subscription-id}/resourceGroups/rg1/providers/Microsoft.Network/networkSecurityGroups/nsg1
```
#### 3. Nested Resource References — Clean Path Syntax
For nested resources like subnets (which are children of VNets), ARM templates require complex expressions:
```json
"id": "[resourceId('Microsoft.Network/virtualNetworks/subnets', 'vnet1', 'subnet1')]"
```
In MechCloud, you use a simple path notation:
```yaml
id: "ref:vnet1/subnets/subnet1"
```
The path follows the pattern: `//`
MechCloud resolves this to:
```
/subscriptions/{subscription-id}/resourceGroups/rg1/providers/Microsoft.Network/virtualNetworks/vnet1/subnets/subnet1
```
#### 4. No `dependsOn` Required
ARM templates require explicit `dependsOn` arrays to ensure resources are created in the correct order:
```json
"dependsOn": [
"[resourceId('Microsoft.Network/virtualNetworks', 'vnet1')]",
"[resourceId('Microsoft.Network/networkSecurityGroups', 'nsg1')]"
]
```
In MechCloud, dependencies are **automatically inferred** from `ref:` references. When you write:
```yaml
network_security_group:
id: "ref:nsg1"
```
MechCloud knows that `nic1` depends on `nsg1` and will create them in the correct order. No manual dependency management required.
### Conversion Rules
| ARM Template | → | MechCloud |
| --------------------------------------------------- | - | ----------------------------------------------------- |
| `"type": "Microsoft.Network/virtualNetworks"` | → | `type: "Microsoft.Network/virtualNetworks"` |
| `"apiVersion": "2025-05-01"` | → | `api_version: "2025-05-01"` |
| `"name": "vnet1"` | → | `name: vnet1` |
| `"properties": { ... }` | → | `props: ...` |
| `addressPrefixes` | → | `address_prefixes` |
| `privateIPAllocationMethod` | → | `private_ip_allocation_method` |
| `storageAccountType` | → | `storage_account_type` |
| `"[resourceGroup().location]"` | → | **Remove** — derived from selected Region in UI |
| `"[resourceId('...', 'name')]"` | → | `"ref:name"` |
| `"[resourceId('Type/SubType', 'parent', 'child')]"` | → | `"ref:parent/subtype/child"` |
| `"dependsOn": [...]` | → | **Remove** — automatically inferred from `ref:` usage |
### Template Variables
MechCloud supports special template variables that are resolved at plan/apply time:
| Variable | Description |
| ---------------- | --------------------------------------------------------------------------------------------------------------- |
| `{{CURRENT_IP}}` | Replaced with the public IP address of the machine executing the plan. Useful for firewall rules and NSG rules. |
**Example usage in NSG rule:**
```yaml
source_address_prefix: "{{CURRENT_IP}}/32"
```
This eliminates the need to manually look up and update your IP address every time it changes.
### Reference Syntax Summary
| Scenario | ARM Template | MechCloud |
| ------------------------------ | ------------------------------------------------------------------------------- | --------------------------- |
| Reference a top-level resource | `[resourceId('Microsoft.Network/networkSecurityGroups', 'nsg1')]` | `ref:nsg1` |
| Reference a nested resource | `[resourceId('Microsoft.Network/virtualNetworks/subnets', 'vnet1', 'subnet1')]` | `ref:vnet1/subnets/subnet1` |
| Reference a NIC from a VM | `[resourceId('Microsoft.Network/networkInterfaces', 'nic1')]` | `ref:nic1` |
### Resource Paths
Each resource in MechCloud has a unique path based on its name and type. For nested resources, the path includes the parent:
| Resource | Path |
| ----------------------- | ----------------------- |
| Virtual Network | `vnet1` |
| Subnet (nested in VNet) | `vnet1/subnets/subnet1` |
| Network Security Group | `nsg1` |
| Network Interface | `nic1` |
| Virtual Machine | `vm1` |
### Referencing Existing Resources
When you need to reference resources that already exist in Azure (not defined in your template), MechCloud supports shorthand formats that are automatically expanded to full Azure resource IDs.
#### Same Resource Group
For existing resources in the **same resource group** as your template's default, use the shorthand format starting with `/providers`:
```yaml
subnet:
id: "/providers/Microsoft.Network/virtualNetworks/existing-vnet/subnets/existing-subnet"
```
MechCloud automatically expands this to the full Azure resource ID:
```
/subscriptions/{subscription-id}/resourceGroups/{resource-group}/providers/Microsoft.Network/virtualNetworks/existing-vnet/subnets/existing-subnet
```
#### Different Resource Group (Same Subscription)
For existing resources in a **different resource group** (but same subscription), use the format starting with `/resourceGroups`:
```yaml
subnet:
id: "/resourceGroups/network-rg/providers/Microsoft.Network/virtualNetworks/shared-vnet/subnets/app-subnet"
```
MechCloud automatically expands this to the full Azure resource ID:
```
/subscriptions/{subscription-id}/resourceGroups/network-rg/providers/Microsoft.Network/virtualNetworks/shared-vnet/subnets/app-subnet
```
**Note**: All resources are provisioned in the same subscription (from the selected cloud account). The subscription ID is automatically obtained from the cloud account metadata — you never need to specify it.
#### Reference Format Summary
| Scenario | Format |
| --------------------------------------------- | ------------------------------------------------------------- |
| Resource in same template | `ref:resource-name` or `ref:parent/child-type/child-name` |
| Existing resource in same resource group | `/providers/Microsoft.{RP}/{type}/{name}` |
| Existing resource in different resource group | `/resourceGroups/{rg}/providers/Microsoft.{RP}/{type}/{name}` |
#### Example: VM Using Existing VNet
This example creates a VM that uses an existing VNet and subnet:
```yaml
defaults:
resource_group: app-rg
resources:
- type: "Microsoft.Network/networkInterfaces"
api_version: "2025-05-01"
name: nic1
props:
ip_configurations:
- name: ipconfig1
props:
subnet:
id: "/providers/Microsoft.Network/virtualNetworks/existing-vnet/subnets/app-subnet"
- type: "Microsoft.Compute/virtualMachines"
api_version: "2025-04-01"
name: vm1
props:
hardware_profile:
vm_size: Standard_B2pts_v2
os_profile:
computer_name: testvm
admin_username: ubuntu
admin_password: SecureP@ss2024!
network_profile:
network_interfaces:
- id: "ref:nic1"
storage_profile:
image_reference:
publisher: Canonical
offer: ubuntu-24_04-lts
sku: server-arm64
version: latest
os_disk:
create_option: FromImage
managed_disk:
storage_account_type: StandardSSD_LRS
```
### Next Steps
1. **Select Execution Context**\
At the top of the MechCloud console, select the execution context for your operation:
* **Team** — e.g., `Academy (User 2)`
* **Cloud Provider** — e.g., `Azure`
* **Cloud Account** — e.g., `Academy`
* **Region** — e.g., `West US 2`
* **Context** — e.g., `azure-random1`
2. **Generate the Plan**\
Click **Plan** to generate an execution plan.\
MechCloud compares the desired state (defined in YAML) with the actual Azure infrastructure and determines which resources require changes.
3. **Review Plan Actions**\
Each resource in the plan shows an `action` indicating how MechCloud will reconcile it:
* `create` — the resource does not exist and will be created.
* `update` — the resource exists but properties differ and will be updated.
* `delete` — the resource exists but is no longer in the desired state and will be removed.
* `recreate` — the resource will be deleted and then created again (for non-updatable property changes).
* `none` — the resource is already in the desired state; no action required.
4. **Apply the Plan (When Changes Exist)**
* The **Apply** button becomes visible **only when** the plan includes at least one resource whose `action` is not `none`.
* Click **Apply** to provision or update resources as per the plan.
* MechCloud will execute the required operations and bring your Azure environment to match the desired state.
5. **Verify Post-Apply State**
* Once the apply completes, click **Plan** again to re-run the comparison.
* If all resources now display `action: none`, the desired and actual states are in sync.
* In this case, the **Apply** button will not be visible because no further changes are required.
6. **Handle Errors (If Any)**
* If any errors occur during the apply step, re-run **Plan** to refresh dependencies and reconcile state.
* Then click **Apply** again to retry provisioning with the updated plan.
# Demos
TODO
# Examples (Resources With Cost)
This section contains examples of Azure resources that have associated costs, organized by Azure Resource Provider.
## Resource Providers
* [Microsoft.Compute](https://github.com/pistonportal/gitbook-mechcloud/blob/main/cloud-computing/stateless-iac/azure/examples-resources-with-cost/Microsoft.Compute) - Virtual Machines, Managed Disks
* [Microsoft.ContainerService](https://github.com/pistonportal/gitbook-mechcloud/blob/main/cloud-computing/stateless-iac/azure/examples-resources-with-cost/Microsoft.ContainerService) - AKS Managed Clusters
* [Microsoft.Network](https://github.com/pistonportal/gitbook-mechcloud/blob/main/cloud-computing/stateless-iac/azure/examples-resources-with-cost/Microsoft.Network) - Public IP Addresses, Load Balancers
# Microsoft.Compute
Azure Compute resources including Virtual Machines and Managed Disks.
* [Virtual Machine](/cloud-computing/stateless-iac/azure/examples-resources-with-cost/microsoft.compute/instance-virtual-machine)
* [Disk (Managed Disk)](/cloud-computing/stateless-iac/azure/examples-resources-with-cost/microsoft.compute/disk)
# Instance (Virtual Machine)
{% hint style="info" %}
**Updated**: February 13, 2026
{% endhint %}
{% hint style="info" %}
These examples assume that linked resources (VNet, Subnet, NIC) already exist in the same resource group.
{% endhint %}
## Creating a virtual machine with Standard SSD
```yaml
defaults:
resource_group: rg1
resources:
- type: "Microsoft.Compute/virtualMachines"
api_version: "2025-04-01"
name: vm1
props:
hardware_profile:
vm_size: Standard_B2pts_v2
os_profile:
computer_name: testvm
admin_username: ubuntu
admin_password: SecureP@ss2024!
network_profile:
network_interfaces:
- id: "/providers/Microsoft.Network/networkInterfaces/nic1"
storage_profile:
image_reference:
publisher: Canonical
offer: ubuntu-24_04-lts
sku: server-arm64
version: latest
os_disk:
create_option: FromImage
delete_option: Delete
managed_disk:
storage_account_type: StandardSSD_LRS
disk_size_gb: 60
```
### Example plan output
```
vm1 (action: create, monthly: $10.93, change: +100%)
=> Compute (price: $0.0084/Hr, monthly: $6.13, spot-price: $0.00756/Hr, spot-monthly: $5.52)
=> OS Disk (monthly: $4.80)
=> E6 LRS Disk Operations (price: $0.002/10K)
=> E6 LRS Disk (price: $4.8/Month, size: 64, monthly: $4.80)
```
## Creating a virtual machine with Premium SSD
```yaml
defaults:
resource_group: rg1
resources:
- type: "Microsoft.Compute/virtualMachines"
api_version: "2025-04-01"
name: vm1
props:
hardware_profile:
vm_size: Standard_B2pts_v2
os_profile:
computer_name: testvm
admin_username: ubuntu
admin_password: SecureP@ss2024!
network_profile:
network_interfaces:
- id: "/providers/Microsoft.Network/networkInterfaces/nic1"
storage_profile:
image_reference:
publisher: Canonical
offer: ubuntu-24_04-lts
sku: server-arm64
version: latest
os_disk:
create_option: FromImage
delete_option: Delete
managed_disk:
storage_account_type: Premium_ZRS
disk_size_gb: 60
```
### Example plan output
```
vm1 (action: create, monthly: $20.05, change: +100%)
=> Compute (price: $0.0084/Hr, monthly: $6.13, spot-price: $0.00756/Hr, spot-monthly: $5.52)
=> OS Disk (monthly: $13.92)
=> P6 ZRS Disk (price: $13.92/Month, size: 64, monthly: $13.92)
```
## Creating a virtual machine with Premium SSD v2
```yaml
defaults:
resource_group: rg1
resources:
- type: "Microsoft.Compute/virtualMachines"
api_version: "2025-04-01"
name: vm1
props:
hardware_profile:
vm_size: Standard_B2pts_v2
os_profile:
computer_name: testvm
admin_username: ubuntu
admin_password: SecureP@ss2024!
network_profile:
network_interfaces:
- id: "/providers/Microsoft.Network/networkInterfaces/nic1"
storage_profile:
image_reference:
publisher: Canonical
offer: ubuntu-24_04-lts
sku: server-arm64
version: latest
os_disk:
create_option: FromImage
delete_option: Delete
managed_disk:
storage_account_type: PremiumV2_LRS
disk_size_gb: 40
disk_iops_read_write: 5000
disk_mbps_read_write: 150
```
### Example plan output
```
vm1 (action: create, monthly: $20.57, change: +100%)
=> Compute (price: $0.0084/Hr, monthly: $6.13, spot-price: $0.00756/Hr, spot-monthly: $5.52)
=> OS Disk (monthly: $14.44)
=> Storage cost (price: $0.00011/GiB/Hr, size: 40, monthly: $3.21)
=> IOPS (monthly: $10.22)
=> Tier 1 (First 3000 IOPS included - quantity: 3000, monthly: $0.00)
=> Tier 2 (Over 3000 IOPS - price: $0.000007/GiB/Hr, quantity: 2000, monthly: $10.22)
=> Throughput (monthly: $1.00)
=> Tier 1 (First 125 MB/s included - quantity: 125, monthly: $0.00)
=> Tier 2 (Over 125 MB/s - price: $0.000055/GiB/Hr, quantity: 25, monthly: $1.00)
```
# Disk
{% hint style="info" %}
**Updated**: February 13, 2026
{% endhint %}
## Creating a Standard HDD disk
```yaml
defaults:
resource_group: rg1
resources:
- type: "Microsoft.Compute/disks"
api_version: "2025-01-02"
name: data-disk-hdd
sku:
name: Standard_LRS
props:
disk_size_gb: 40
creation_data:
create_option: Empty
```
### Example plan output
```
data-disk-hdd (action: create, monthly: $3.01, change: +100%)
=> Storage (monthly: $3.01)
=> S6 LRS Disk (price: $3.008/Month, size: 64, monthly: $3.01)
=> S6 LRS Disk Operations (price: $0.0005/10K)
```
## Creating a Standard SSD disk
```yaml
defaults:
resource_group: rg1
resources:
- type: "Microsoft.Compute/disks"
api_version: "2025-01-02"
name: data-disk-ssd
sku:
name: StandardSSD_LRS
props:
disk_size_gb: 40
creation_data:
create_option: Empty
```
### Example plan output
```
data-disk-ssd (action: create, monthly: $4.80, change: +100%)
=> Storage (monthly: $4.80)
=> E6 LRS Disk Operations (price: $0.002/10K)
=> E6 LRS Disk (price: $4.8/Month, size: 64, monthly: $4.80)
```
## Creating a Premium SSD disk
```yaml
defaults:
resource_group: rg1
resources:
- type: "Microsoft.Compute/disks"
api_version: "2025-01-02"
name: data-disk-premium
sku:
name: Premium_LRS
props:
disk_size_gb: 40
creation_data:
create_option: Empty
```
### Example plan output
```
data-disk-premium (action: create, monthly: $9.28, change: +100%)
=> Storage (monthly: $9.28)
=> P6 LRS Disk (price: $9.2801/Month, size: 64, monthly: $9.28)
```
## Creating a Premium SSD with Zone Redundancy
```yaml
defaults:
resource_group: rg1
resources:
- type: "Microsoft.Compute/disks"
api_version: "2025-01-02"
name: data-disk-premium-zrs
sku:
name: Premium_ZRS
props:
disk_size_gb: 100
creation_data:
create_option: Empty
```
### Example plan output
```
data-disk-premium-zrs (action: create, monthly: $26.88, change: +100%)
=> Storage (monthly: $26.88)
=> P10 ZRS Disk (price: $26.88/Month, size: 128, monthly: $26.88)
```
## Creating a Premium SSD v2 disk
Premium SSD v2 allows you to configure IOPS and throughput independently of disk size.
```yaml
defaults:
resource_group: rg1
resources:
- type: "Microsoft.Compute/disks"
api_version: "2025-01-02"
name: data-disk-premium-v2
sku:
name: PremiumV2_LRS
props:
disk_size_gb: 100
disk_iops_read_write: 5000
disk_mbps_read_write: 200
creation_data:
create_option: Empty
```
### Example plan output
```
data-disk-premium-v2 (action: create, monthly: $21.26, change: +100%)
=> Storage (monthly: $21.26)
=> Storage cost (price: $0.00011/GiB/Hr, size: 100, monthly: $8.03)
=> IOPS (monthly: $10.22)
=> Tier 1 (First 3000 IOPS included - quantity: 3000, monthly: $0.00)
=> Tier 2 (Over 3000 IOPS - price: $7e-06/Hr, quantity: 2000, monthly: $10.22)
=> Throughput (monthly: $3.01)
=> Tier 1 (First 125 MB/s included - quantity: 125, monthly: $0.00)
=> Tier 2 (Over 125 MB/s - price: $5.5e-05/Hr, quantity: 75, monthly: $3.01)
```
## Disk Tier Reference
Azure charges by tier, not exact GB size. When you specify a disk size, Azure provisions the next tier up.
### Standard HDD Tiers
| Tier | Capacity |
| ---- | -------- |
| S4 | 32 GB |
| S6 | 64 GB |
| S10 | 128 GB |
| S15 | 256 GB |
| S20 | 512 GB |
| S30 | 1024 GB |
### Standard SSD Tiers
| Tier | Capacity |
| ---- | -------- |
| E4 | 32 GB |
| E6 | 64 GB |
| E10 | 128 GB |
| E15 | 256 GB |
| E20 | 512 GB |
| E30 | 1024 GB |
### Premium SSD Tiers
| Tier | Capacity |
| ---- | -------- |
| P4 | 32 GB |
| P6 | 64 GB |
| P10 | 128 GB |
| P15 | 256 GB |
| P20 | 512 GB |
| P30 | 1024 GB |
# Microsoft.ContainerService
Azure Container Service resources including AKS (Azure Kubernetes Service) managed clusters.
* [AKS Managed Cluster](/cloud-computing/stateless-iac/azure/examples-resources-with-cost/microsoft.containerservice/managed-cluster)
# AKS Managed Cluster
{% hint style="info" %}
**Updated**: February 17, 2026
{% endhint %}
{% hint style="info" %}
AKS pricing includes cluster management (control plane) and worker node VM costs. The Free tier has no control plane charge. Standard and Premium tiers have uptime SLA / LTS charges. Worker node costs are calculated per node pool using Virtual Machines pricing.
{% endhint %}
## Creating an AKS cluster with Standard tier
```yaml
defaults:
resource_group: rg-aks-test
resources:
- type: "Microsoft.ContainerService/managedClusters"
name: aks-minimal
api_version: "2025-10-01"
location: eastus
sku:
name: Base
tier: Standard
identity:
type: SystemAssigned
props:
dns_prefix: aksmin
agent_pool_profiles:
- name: nodepool1
count: 1
vm_size: Standard_B2s
os_type: Linux
mode: System
os_disk_size_gb: 30
network_profile:
network_plugin: kubenet
load_balancer_sku: basic
enable_rbac: true
```
## Creating an AKS cluster with Free tier
```yaml
defaults:
resource_group: rg-aks-test
resources:
- type: "Microsoft.ContainerService/managedClusters"
name: aks-minimal
api_version: "2025-10-01"
location: eastus
sku:
name: Base
tier: Free
identity:
type: SystemAssigned
props:
dns_prefix: aksmin
agent_pool_profiles:
- name: nodepool1
count: 1
vm_size: Standard_B2s
os_type: Linux
mode: System
os_disk_size_gb: 30
network_profile:
network_plugin: kubenet
load_balancer_sku: basic
enable_rbac: true
```
## Creating an AKS cluster with Premium tier
```yaml
defaults:
resource_group: rg-aks-test
resources:
- type: "Microsoft.ContainerService/managedClusters"
name: aks-premium
api_version: "2025-10-01"
location: eastus
sku:
name: Base
tier: Premium
identity:
type: SystemAssigned
props:
dns_prefix: aksprem
agent_pool_profiles:
- name: nodepool1
count: 3
vm_size: Standard_D4s_v3
os_type: Linux
mode: System
network_profile:
network_plugin: azure
enable_rbac: true
```
# Microsoft.Network
Azure Network resources including Public IP Addresses and Load Balancers.
* [Public IP Address](/cloud-computing/stateless-iac/azure/examples-resources-with-cost/microsoft.network/public-ip-address)
* [Load Balancer](/cloud-computing/stateless-iac/azure/examples-resources-with-cost/microsoft.network/load-balancer)
* [Application Gateway](/cloud-computing/stateless-iac/azure/examples-resources-with-cost/microsoft.network/application-gateway)
# Public IP Address
{% hint style="info" %}
**Updated**: February 13, 2026
{% endhint %}
## Creating a Standard Public IP
```yaml
defaults:
resource_group: rg1
resources:
- type: "Microsoft.Network/publicIPAddresses"
name: "lb-public-ip"
api_version: "2025-05-01"
sku:
# Default value is 'Basic'
name: "Standard"
```
### Example plan output
```
lb-public-ip (action: create, monthly: $3.65, change: +100%)
=> Public IP (Standard, Static) (price: $0.005/Hr, monthly: $3.65)
```
# Load Balancer
{% hint style="info" %}
**Updated**: February 13, 2026
{% endhint %}
{% hint style="info" %}
These examples assume that linked resources (VNet, Subnet, Public IP) already exist in the same resource group.
{% endhint %}
## Creating a Standard private Load Balancer
```yaml
defaults:
resource_group: rg1
resources:
- type: "Microsoft.Network/loadBalancers"
name: "private-lb-microservice"
api_version: "2025-05-01"
sku:
name: "Standard"
props:
frontend_ip_configurations:
- name: "internal-fe"
props:
subnet:
id: "/providers/Microsoft.Network/virtualNetworks/vnet1/subnets/subnet1"
private_ip_allocation_method: "Dynamic"
backend_address_pools:
- name: "microservice-backend-pool"
probes:
- name: "microservice-probe"
props:
protocol: "Tcp"
port: 5000
interval_in_seconds: 5
number_of_probes: 2
load_balancing_rules:
- name: "http-rule"
props:
protocol: "Tcp"
frontend_port: 80
backend_port: 5000
frontend_ip_configuration:
id: "ref:private-lb-microservice/frontend_ip_configurations/internal-fe"
backend_address_pool:
id: "ref:private-lb-microservice/backend_address_pools/microservice-backend-pool"
probe:
id: "ref:private-lb-microservice/probes/microservice-probe"
enable_floating_ip: false
idle_timeout_in_minutes: 4
```
### Example plan output
```
private-lb-microservice (action: create, monthly: $18.25, change: +100%)
=> Base Price (Includes 5 rules) (price: $0.025/Hrs, monthly: $18.25)
=> Additional Rules (price: $0.010/rule/Hrs, quantity: 0, monthly: $0.00)
=> Data transfer (price: $0.005/GB)
```
## Creating a Standard public Load Balancer
```yaml
defaults:
resource_group: rg1
resources:
- type: "Microsoft.Network/loadBalancers"
name: "public-lb-microservice"
api_version: "2025-05-01"
sku:
name: "Standard"
props:
frontend_ip_configurations:
- name: "public-fe"
props:
public_ip_address:
id: "/providers/Microsoft.Network/publicIPAddresses/lb-public-ip"
backend_address_pools:
- name: "microservice-backend-pool"
probes:
- name: "microservice-probe"
props:
protocol: "Tcp"
port: 5000
interval_in_seconds: 5
number_of_probes: 2
load_balancing_rules:
- name: "http-rule"
props:
protocol: "Tcp"
frontend_port: 80
backend_port: 5000
frontend_ip_configuration:
id: "ref:public-lb-microservice/frontend_ip_configurations/public-fe"
backend_address_pool:
id: "ref:public-lb-microservice/backend_address_pools/microservice-backend-pool"
probe:
id: "ref:public-lb-microservice/probes/microservice-probe"
enable_floating_ip: false
idle_timeout_in_minutes: 4
```
### Example plan output
```
public-lb-microservice (action: create, monthly: $18.25, change: +100%)
=> Base Price (Includes 5 rules) (price: $0.025/Hr, monthly: $18.25)
=> Additional Rules (price: $0.01/rule/Hr, quantity: 0, monthly: $0.00)
=> Data transfer (price: $0.005/GB)
```
# Application Gateway
{% hint style="info" %}
**Updated**: February 13, 2026
{% endhint %}
{% hint style="info" %}
These examples assume that linked resources (VNet, Subnet, Public IP) already exist in the same resource group.
{% endhint %}
## Creating a Basic Application Gateway
```yaml
defaults:
resource_group: rg1
resources:
- type: "Microsoft.Network/applicationGateways"
name: "public-appgw-v2"
api_version: "2025-05-01"
props:
sku:
tier: "Basic"
name: "Basic"
gateway_ip_configurations:
- name: "appgw-ip-config"
props:
subnet:
id: "/providers/Microsoft.Network/virtualNetworks/vnet1/subnets/appgw-subnet"
frontend_ip_configurations:
- name: "appgw-frontend"
props:
public_ip_address:
id: "/providers/Microsoft.Network/publicIPAddresses/appgw-public-ip"
frontend_ports:
- name: "http-port"
props:
port: 80
backend_address_pools:
- name: "backend-pool"
props:
backend_addresses:
- ip_address: "10.0.1.4"
backend_http_settings_collection:
- name: "backend-http-settings"
props:
port: 80
protocol: "Http"
cookie_based_affinity: "Disabled"
request_timeout: 30
http_listeners:
- name: "http-listener"
props:
frontend_ip_configuration:
id: "ref:public-appgw-v2/frontend_ip_configurations/appgw-frontend"
frontend_port:
id: "ref:public-appgw-v2/frontend_ports/http-port"
protocol: "Http"
probes:
- name: "health-probe"
props:
protocol: "Http"
path: "/"
interval: 30
timeout: 30
unhealthy_threshold: 3
request_routing_rules:
- name: "basic-routing-rule"
props:
rule_type: "Basic"
http_listener:
id: "ref:public-appgw-v2/http_listeners/http-listener"
backend_address_pool:
id: "ref:public-appgw-v2/backend_address_pools/backend-pool"
backend_http_settings:
id: "ref:public-appgw-v2/backend_http_settings_collection/backend-http-settings"
```
### Example plan output
```
public-appgw-v2 (action: create, monthly: $22.27, change: +100%)
=> Fixed Cost (Basic) (price: $0.0225/Hr, monthly: $16.43)
=> Capacity Units (Basic) (price: $0.008/Hr, quantity: 1, monthly: $5.84)
```
## Creating a Standard v2 Application Gateway
```yaml
defaults:
resource_group: rg1
resources:
- type: "Microsoft.Network/applicationGateways"
name: "public-appgw-v2"
api_version: "2025-05-01"
props:
sku:
tier: "Standard_v2"
name: "Standard_v2"
gateway_ip_configurations:
- name: "appgw-ip-config"
props:
subnet:
id: "/providers/Microsoft.Network/virtualNetworks/vnet1/subnets/appgw-subnet"
frontend_ip_configurations:
- name: "appgw-frontend"
props:
public_ip_address:
id: "/providers/Microsoft.Network/publicIPAddresses/appgw-public-ip"
frontend_ports:
- name: "http-port"
props:
port: 80
backend_address_pools:
- name: "backend-pool"
props:
backend_addresses:
- ip_address: "10.0.1.4"
backend_http_settings_collection:
- name: "backend-http-settings"
props:
port: 80
protocol: "Http"
cookie_based_affinity: "Disabled"
request_timeout: 30
http_listeners:
- name: "http-listener"
props:
frontend_ip_configuration:
id: "ref:public-appgw-v2/frontend_ip_configurations/appgw-frontend"
frontend_port:
id: "ref:public-appgw-v2/frontend_ports/http-port"
protocol: "Http"
probes:
- name: "health-probe"
props:
protocol: "Http"
path: "/"
interval: 30
timeout: 30
unhealthy_threshold: 3
request_routing_rules:
- name: "basic-routing-rule"
props:
rule_type: "Basic"
http_listener:
id: "ref:public-appgw-v2/http_listeners/http-listener"
backend_address_pool:
id: "ref:public-appgw-v2/backend_address_pools/backend-pool"
backend_http_settings:
id: "ref:public-appgw-v2/backend_http_settings_collection/backend-http-settings"
```
### Example plan output
```
public-appgw-v2 (action: create, monthly: $151.84, change: +100%)
=> Fixed Cost (Standard) (price: $0.2/Hr, monthly: $146.00)
=> Capacity Units (Standard) (price: $0.008/Hr, quantity: 1, monthly: $5.84)
```
## Creating a WAF v2 Application Gateway
```yaml
defaults:
resource_group: rg1
resources:
- type: "Microsoft.Network/applicationGateways"
name: "public-appgw-v2"
api_version: "2025-05-01"
props:
sku:
tier: "WAF_v2"
name: "WAF_v2"
gateway_ip_configurations:
- name: "appgw-ip-config"
props:
subnet:
id: "/providers/Microsoft.Network/virtualNetworks/vnet1/subnets/appgw-subnet"
frontend_ip_configurations:
- name: "appgw-frontend"
props:
public_ip_address:
id: "/providers/Microsoft.Network/publicIPAddresses/appgw-public-ip"
frontend_ports:
- name: "http-port"
props:
port: 80
backend_address_pools:
- name: "backend-pool"
props:
backend_addresses:
- ip_address: "10.0.1.4"
backend_http_settings_collection:
- name: "backend-http-settings"
props:
port: 80
protocol: "Http"
cookie_based_affinity: "Disabled"
request_timeout: 30
http_listeners:
- name: "http-listener"
props:
frontend_ip_configuration:
id: "ref:public-appgw-v2/frontend_ip_configurations/appgw-frontend"
frontend_port:
id: "ref:public-appgw-v2/frontend_ports/http-port"
protocol: "Http"
probes:
- name: "health-probe"
props:
protocol: "Http"
path: "/"
interval: 30
timeout: 30
unhealthy_threshold: 3
request_routing_rules:
- name: "basic-routing-rule"
props:
rule_type: "Basic"
http_listener:
id: "ref:public-appgw-v2/http_listeners/http-listener"
backend_address_pool:
id: "ref:public-appgw-v2/backend_address_pools/backend-pool"
backend_http_settings:
id: "ref:public-appgw-v2/backend_http_settings_collection/backend-http-settings"
```
### Example plan output
```
public-appgw-v2 (action: create, monthly: $273.31, change: +100%)
=> Fixed Cost (Standard) (price: $0.36/Hr, monthly: $262.80)
=> Capacity Units (Standard) (price: $0.0144/Hr, quantity: 1, monthly: $10.51)
```
# Examples (Free Resources )
* [VPC and Subnet](/cloud-computing/stateless-iac/azure/examples-free-resources/vpc-and-subnet)
* [Network Security Group](/cloud-computing/stateless-iac/azure/examples-free-resources/network-security-group)
* [Network Interface](/cloud-computing/stateless-iac/azure/examples-free-resources/network-interface)
# Vpc and subnet
{% hint style="info" %}
**Updated**: February 13, 2026
{% endhint %}
## Creating a vpc and subnet with minimal parameters
```
resources:
- type: "Microsoft.Network/virtualNetworks"
name: vnet1
props:
resource_group: rg1
address_space:
address_prefixes:
- "10.0.0.0/16"
subnets:
- name: subnet1
props:
address_prefix: "10.0.1.0/24"
```
# Network Security Group
{% hint style="info" %}
**Updated**: February 13, 2026
{% endhint %}
## Creating an NSG with SSH rule
```yaml
defaults:
resource_group: rg1
resources:
- type: "Microsoft.Network/networkSecurityGroups"
api_version: "2025-05-01"
name: nsg1
props:
security_rules:
- name: allow-ssh
props:
priority: 100
direction: Inbound
access: Allow
protocol: Tcp
source_port_range: "*"
destination_port_range: "22"
source_address_prefix: "{{CURRENT_IP}}/32"
destination_address_prefix: "*"
```
# Network Interface
{% hint style="info" %}
**Updated**: February 13, 2026
{% endhint %}
{% hint style="info" %}
These examples assume that linked resources (VNet, Subnet, NSG) already exist in the same resource group.
{% endhint %}
## Creating a NIC with NSG
```yaml
defaults:
resource_group: rg1
resources:
- type: "Microsoft.Network/networkInterfaces"
api_version: "2025-05-01"
name: nic1
props:
network_security_group:
id: "/providers/Microsoft.Network/networkSecurityGroups/nsg1"
ip_configurations:
- name: ipconfig1
props:
subnet:
id: "/providers/Microsoft.Network/virtualNetworks/vnet1/subnets/subnet1"
```
# GCP
MechCloud's Stateless Infrastructure as Code (IaC) for Google Cloud Platform (GCP) enables you to declaratively manage your GCP resources without relying on state files, eliminating common issues like state drift. By defining your desired infrastructure in YAML and comparing it directly against your live GCP environment, you can provision, update, and delete resources with confidence. This feature supports a range of GCP resources (e.g., VPC networks, subnetworks, firewalls, compute instances, disks, GKE clusters) and integrates real-time pricing to provide proactive cost insights during planning.
{% embed url="" %}
For details on resource contexts (equivalent to Kubernetes namespaces for scoping resources), see the Resource Contexts documentation.
### Key Concepts
#### Desired State
The desired state is your YAML blueprint describing the infrastructure you want. It's hierarchical, using nesting to define parent-child relationships (e.g., a subnetwork inside a VPC network).
**Requirements**:
* Each resource must have a **unique relative path** based on its hierarchy (e.g., vpc1/subnet1/vm1), similar to a Linux file path. This is your responsibility to ensure uniqueness and prevent conflicts.
* Use `snake_case` for all properties.
* No explicit parent references (e.g., no network link for a subnetwork—MechCloud infers from hierarchy).
* References:
* **Sibling references** (same parent): ref:\ (e.g., ref:firewall1).
* **Non-sibling references** (cross-hierarchy): ref:\ (e.g., ref:vpc1/firewall1).
#### Actual State
The actual state is a real-time snapshot of your GCP resources in the selected context, formatted to match the desired state structure (hierarchical, snake\_case properties). It includes resource types, names, identifiers, and properties.
#### Plan
The plan compares desired and actual states, proposing actions:
* **Create**: New resources.
* **Update**: In-place changes.
* **Recreate**: When at least one immutable property differs (requires delete + create).
* **Delete**: Remove extra resources.
* **None**: No changes needed.
Plans show hierarchy with indentation (-- for children) and include real-time pricing for compute/storage resources (hourly/monthly costs, % change).
# Real-time Pricing
MechCloud displays cost information directly in the plan output before any infrastructure changes are applied. This enables cost-aware infrastructure decisions during development rather than discovering costs after deployment.
### Overview
When generating an execution plan, MechCloud calculates and displays comprehensive cost information for GCP resources that have associated costs.
### Supported Billing Models
| Model | How it appears in the plan | Examples |
| -------------------- | ------------------------------------------- | ------------------------------ |
| Usage-based (hourly) | Hourly rate + max monthly total (730 hours) | Compute Engine VM, GKE Cluster |
| Storage (GB-month) | Rate + total when size is known | Persistent Disk |
#### Usage-Based Charges (Price + Cost)
For resources with **predictable usage patterns**, MechCloud shows both price rates and calculated costs:
* Compute Engine instance hours
* Persistent Disk storage (GB-Mo)
* GKE Cluster management fee
Example: A Compute Engine `e2-micro` instance shows `price: $0.00835/Hrs, monthly: $6.10`
### Cost Change Tracking
MechCloud displays cost change percentages for all resource actions, helping you understand the financial impact of infrastructure changes.
#### Create Actions
When creating new resources, the cost change is **+100%** (from $0 to the new cost):
```
vm1 (action: create, price: $0.00835/Hrs, monthly: $6.10, change: +100%)
```
#### Update Actions
When modifying existing resources, the change percentage reflects the actual cost difference.
#### Delete Actions
When deleting resources, the cost change is **-100%** (from current cost to $0):
```
vm1 (action: delete, price: $0.00/Hrs, monthly: $0.00, change: -100%)
```
### Plan Output Examples
#### Compute Engine Instance (Usage-Based Charges)
Compute Engine instances have predictable usage patterns, so MechCloud calculates and displays actual hourly and monthly costs.
**Creating a Compute Engine instance:**
```yaml
defaults:
zone: us-central1-a
resources:
- type: compute.v1.instance
name: vm1
props:
machine_type: machineTypes/e2-micro
disks:
- boot: true
auto_delete: true
initialize_params:
disk_size_gb: 30
disk_type: diskTypes/pd-standard
source_image: projects/ubuntu-os-cloud/global/images/family/ubuntu-2404-lts
network_interfaces:
- subnetwork: subnetworks/subnet1
access_configs:
- type: ONE_TO_ONE_NAT
name: External NAT
```
**Plan output:**
```
vm1 (action: create)
=> Price (vCPU) - price: $0.02289/Hrs, quantity: 2, monthly: $33.42, change: +100%
=> Price (RAM) - price: $0.00308/GB-Hrs, quantity: 1, monthly: $2.25, change: +100%
=> Price (Boot Disk) - price: $0.04/GB-Mo, quantity: 30, monthly: $1.20, change: +100%
```
The plan shows:
* **vCPU price**: Calculated hourly cost for vCPUs.
* **RAM price**: Calculated hourly cost for Memory (GB).
* **Boot Disk**: Calculated monthly cost for the specified Persistent Disk.
* **Monthly**: Estimated monthly cost (hourly × 730 hours).
* **Change**: `+100%` - new resource.
### Supported Resources
MechCloud provides real-time pricing for the following GCP resource types:
| Offering | Resource Type |
| --------------- | ------------------------------------------ |
| Compute Engine | Instance (VM) |
| | Disk (Persistent Disk) |
| | Address (Static External IP) |
| | Forwarding Rule (Load Balancer) |
| GKE | Cluster |
| | Node Pool |
| Cloud SQL | Instance (MySQL / PostgreSQL / SQL Server) |
| Memorystore | Redis Instance |
| Cloud Storage | Bucket |
| Cloud DNS | Managed Zone |
| Cloud Run | Service |
| Cloud Functions | Function |
| Pub/Sub | Topic |
| Cloud Spanner | Instance |
| Cloud NAT | Gateway (Router) |
| VPN | Tunnel |
For detailed pricing examples, see [Examples (Resources With Cost)](/cloud-computing/stateless-iac/gcp/examples-resources-with-cost).
### Regional Pricing
Costs vary by GCP region. MechCloud automatically applies region-specific pricing.
### Using Pricing Data
#### Track Environment Costs
When generating plans for different Resource Contexts:
```
Development environment (context: app-dev)
Monthly cost: $125.43
Production environment (context: app-prod)
Monthly cost: $892.15
```
### Best Practices
**Include cost justification in code comments** - Document why specific instance types or sizes were chosen.
**Compare costs during code review** - Review cost deltas alongside configuration changes.
**Track cost trends over time** - Save plan outputs to monitor infrastructure cost evolution.
**Use Resource Context for cost isolation** - Separate cost tracking by environment (dev, staging, prod).
**Monitor actual vs estimated costs** - Compare MechCloud estimates against actual cloud bills to refine understanding.
### Integration with Stateless IaC
Real-time pricing works seamlessly with MechCloud's stateless architecture:
**Fresh pricing every plan** - No stale data from state files
**Accurate cost deltas** - Costs compared against actual current state
**Environment isolation** - Resource Context enables per-environment cost tracking
### Next Steps
* [Examples (Resources With Cost)](/cloud-computing/stateless-iac/gcp/examples-resources-with-cost)
* [Authoring Desired State](/cloud-computing/stateless-iac/gcp/authoring-desired-state)
# Authoring desired state
This guide explains how to **author the desired state** in MechCloud Stateless IaC for GCP. You define your infrastructure using a clean, hierarchical YAML format that is inspired by Terraform but significantly simpler — no logical IDs, no state files, and no HCL. Instead, you use **nesting for relationships**, **`snake_case` for properties**, and **`ref:` syntax** for cross-resource references.
### Key Principles
| Principle | Description |
| ---------------------------- | --------------------------------------------------------------------------------------------------------------- |
| **Hierarchy = Relationship** | Nest resources to define parent-child relationships (e.g., subnetwork inside VPC network). |
| **Unique Relative Paths** | Every resource must have a unique path (e.g., `vpc1/subnet1/vm1`). You are responsible for ensuring uniqueness. |
| **`snake_case` Properties** | All keys use lowercase with underscores (e.g., `auto_create_subnetworks`, not `autoCreateSubnetworks`). |
| **No Parent Links** | Do **not** include `network` for subnetwork — MechCloud infers them from nesting. |
| **Sibling References** | Use `ref:` **only** if both resources are in the **same `resources:` block**. |
| **Non-Sibling References** | Use `ref:` to reference resources outside the current parent. |
### Step-by-Step: Example to MechCloud Desired State
Here is a GCP desired state example using the `compute.v1.instance` resource. It assumes that the linked resources (Network, Subnetwork) already exist in the same environment.
#### MechCloud Desired State
```yaml
defaults:
zone: us-central1-a
resources:
- type: compute.v1.instance
name: vm1
props:
machine_type: machineTypes/e2-micro
disks:
- boot: true
auto_delete: true
initialize_params:
# Set to 30GB to maximize the Free Tier limit
disk_size_gb: 30
# Set to pd-standard (Standard Persistent Disk) for Free Tier eligibility
disk_type: diskTypes/pd-standard
source_image: projects/ubuntu-os-cloud/global/images/family/ubuntu-2404-lts
network_interfaces:
- subnetwork: subnetworks/subnet1
access_configs:
- type: ONE_TO_ONE_NAT
name: External NAT
```
### Using `defaults` for Zonal Resources
In GCP, many resources are zonal or regional and require a `zone` or `location` property, as well as full paths that include the region or zone (e.g., `zones/us-central1-a/machineTypes/e2-micro`). To simplify authoring, you can use the `defaults:` block at the top of your YAML file for zones, while the region is automatically inferred from the Execution Context.
By setting a default `zone` in the YAML, MechCloud does two things automatically:
1. **Property Injection**: It injects the `zone` into the resource's `props` if it is missing. You don't need to repeatedly specify `zone: us-central1-a` on every disk or instance, or `location: us-central1-a` on a GKE cluster. (For regional resources, the region selected in the Execution Context dropdown is automatically injected).
2. **Path Expansion**: It expands short paths for you:
* `machineTypes/e2-micro` becomes `zones/us-central1-a/machineTypes/e2-micro`
* `diskTypes/pd-standard` becomes `zones/us-central1-a/diskTypes/pd-standard`
This makes your desired state much easier to read and maintain across different environments.
### Referencing Resources
In this template, the instance (`vm1`) needs to refer to the subnetwork in its network interfaces. There is no need to specify the `network` property for the instance, as specifying the subnetwork is sufficient.
Because the subnetwork reference points to a resource that is already existing and not defined in the same template, we provide a path relative to the project id (e.g. `subnetworks/subnet1`) instead of using `ref:`.
**Regional vs Global Paths**:
* If the target subnetwork exists in the **same region** selected in your Execution Context, you can use the short path: `subnetworks/subnet1`. MechCloud will automatically expand this to the full regional path (`regions//subnetworks/subnet1`).
* If the target subnetwork is in a **different region**, you must specify the full relative path: `regions/europe-west1/subnetworks/subnet1`.
* For global resources (like VPC Networks), you must use the full path: `global/networks/vpc1`.
If the linked resources were being created in the *same* template, you would use the `ref:` or `ref:` syntax so MechCloud could resolve their IDs dynamically during plan and apply:
* **Short name (sibling) form:** `ref:` — used when one resource needs the link of another resource that is declared **together under the same parent**.
* **Full-path (non-sibling) form:** `ref:` — used when the referencing resource is in a different part of the hierarchy (different parent).
### Conversion Rules
> **Tip**: Use hyphens in names for readability (e.g., `my-vpc`), but avoid spaces or special characters.
| Terraform / API Property | → | MechCloud |
| ------------------------------------------ | - | ---------------------------- |
| `type: google_compute_network` | → | `type: compute.v1.network` |
| `autoCreateSubnetworks` | → | `auto_create_subnetworks` |
| `network` (for Subnetwork) | → | **Remove** — use nesting |
| `subnetwork: google_compute_subnetwork.id` | → | `subnetwork: ref:vpc/subnet` |
Notes and clarifications:
* `snake_case` is mandatory in MechCloud YAML. MechCloud translates these property names to the GCP API property names when making provider calls (for example `auto_create_subnetworks` → `autoCreateSubnetworks`).
* There are two kinds of `ref:` forms:
* **Short name (sibling) form:** `ref:` — used when one resource needs the link of another resource that is declared **together under the same parent**.
* **Full-path (non-sibling) form:** `ref:` — used when the referencing resource is in a different part of the hierarchy (different parent).
### **Resource Paths (Must Be Unique)**
Each resource gets a **unique relative path** based on its nesting within the hierarchy. This path allows MechCloud to resolve references (`ref:`) precisely at plan and apply time.
| Resource | Path |
| ---------- | ---------------- |
| Network | `vpc1` |
| Subnetwork | `vpc1/subnet1` |
| Firewall | `vpc1/allow-ssh` |
| Instance | `vm1` |
Each resource’s path must be unique across the entire desired state file.
### Next Steps
1. **Select Execution Context** At the top of the MechCloud console, select the execution context for your operation:
* **Team** — e.g., `Academy (User 2)`
* **Cloud Provider** — e.g., `GCP`
* **Cloud Account** — e.g., `My GCP Project`
* **Region** — e.g., `us-central1`
* **Context** — e.g., `app1-dev1`
2. **Generate the Plan** Click **Plan** to generate an execution plan. MechCloud compares the desired state (defined in YAML) with the actual GCP infrastructure and determines which resources require changes.
3. **Review Plan Actions** Each resource in the plan shows an `action` indicating how MechCloud will reconcile it:
* `create` — the resource does not exist and will be created.
* `update` — the resource exists but properties differ and will be updated.
* `delete` — the resource exists but is no longer in the desired state and will be removed.
* `recreate` — the resource will be deleted and then created again (for non-updatable property changes).
* `none` — the resource is already in the desired state; no action required.
4. **Apply the Plan (When Changes Exist)**
* The **Apply** button becomes visible **only when** the plan includes at least one resource whose `action` is not `none`.
* Click **Apply** to provision or update resources as per the plan.
* MechCloud will execute the required operations and bring your GCP environment to match the desired state.
5. **Verify Post-Apply State**
* Once the apply completes, click **Plan** again to re-run the comparison.
* If all resources now display `action: none`, the desired and actual states are in sync.
* In this case, the **Apply** button will not be visible because no further changes are required.
6. **Handle Errors (If Any)**
* If any errors occur during the apply step, re-run **Plan** to refresh dependencies and reconcile state.
* Then click **Apply** again to retry provisioning with the updated plan.
---
[Next Page](https://docs.mechcloud.io/llms-full.txt/1)